Manage field names and their content
Modify easily the field names and the field contents
After selecting a set of entries, go to Edit → Manage field names and content, to set, append, rename and clear a field.
To select all the entries of the current library, pressCTRL + A.
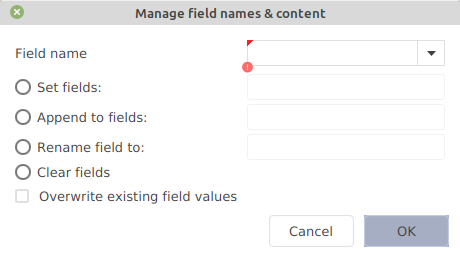
This dialog window is displayed:

Set the field name (by typing it in or using the drop-down menu), and select the action to be carried out. Additionally, a checkbox allows overwriting the existing field values.
The actions are:
Set fields. Enter the field content to be used. For example, "Field name = owner" and "Set fields = Smith" adds the line "owner = {Smith}," to the entries. If the field "owner" is already present in an entry, it is not modified, except if "Overwrite existing field values" is checked.
Append to fields. Enter the string to be appended at the end of the field content (if the field does not exist, it will be created). For example, "Field name = keywords" and "Add to fields = , programming" adds the keyword "programming" to the list of keywords.
Rename field to. Enter the new name for this field. For example, "Field name = institution" and "Rename fields = school" renames the field "institution" into "school". The field content is not altered.
Clear fields. This removes the field from the entries. For example, set the "Field name" to "comments". If "Overwrite existing field values" is checked, all the fields "comments" (and their content) are removed. If it is not checked, only the empty fields "comments" are removed.
External resource: A concrete example of using this feature to prune a library.
Was this helpful?