This tool allows you to search for citations in LaTeX files.
In the user interface, a tab was added to the entry editor, the aesthetics have been improved, and the tool was renamed to Search for Citations in LaTeX files.
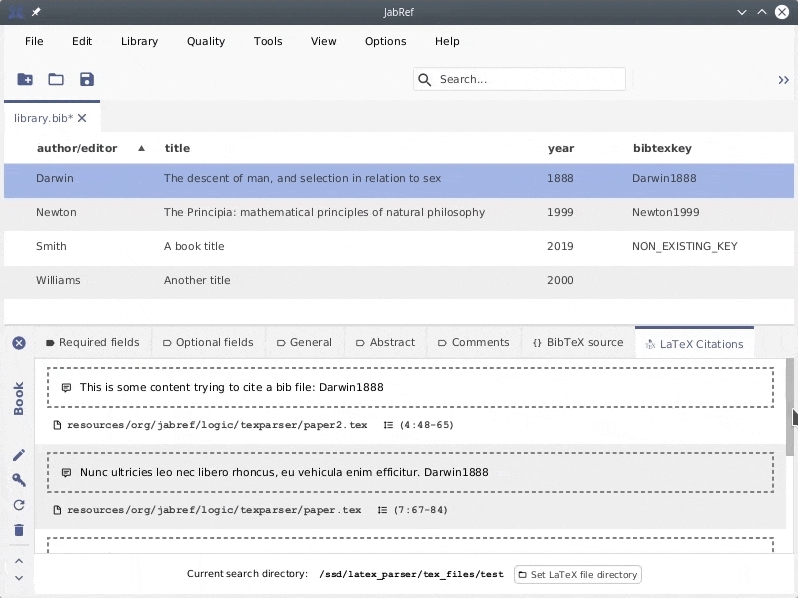
A new tab was added to the entry editor. It allows to search for citations to the active entry in the LaTeX file directory. It can be configured in the Library properties dialog.
See the image below to see how it works:
A LaTeX Citations tab has been added to the entry editor.
This tab can be disabled in the Entry editor preferences.
A progress indicator appears while parsing.
Current search is cancelled if another entry is selected.
Parsed files are stored when the tool is run for the first time (to achieve better performance).
The current search path is shown at the bottom, next to a button to set the LaTeX file directory.
A user-friendly error logging and handling has also been implemented.
The citations list view is the same for dialog tool and tab.
The context of citations is shown instead of the whole line of text (which is shown as a tooltip).
Absolute file path has been changed into a relative one, from the search path.
New icons and styles for context, file path, and position (line and column) of a citation.
JabRef can optionally mark all new entries added or imported to a library with your username.
You can disable or enable this feature by entering Options → Preferences → General, and selecting/deselecting the line 'mark new entries with owner name'. You can also change the name used to mark entries. By default, your user name is used. Finally, if an entry with an existing field 'owner' is imported, the field is updated with your name if 'Overwrite' is checked.
The owner name is added in a field called 'owner', which by default is visible in the General fields tab in the entry editor.
JabRef supports following fields to jump to other entries.
Following fields are supported:
cites - comma separated list of citation keys which are cited by this entry
crossref - single entry which is cross referenced.
related - comma separated list of citation keys which are in some kind related to this entry. The type of all relations can be specified by a single relatedtype (see https://github.com/plk/biblatex/issues/475#issuecomment-246931180). Note: biblatex prints this information if related is active at the biblatex package.
To use the crossref field, navigate to the general tab and insert the Crossref at the top.
To use cites and related, follow these steps:
Navigate to Bib(la)TeX source
Insert related = {citationkey},
Close the entry editor
Open the entry editor
Navigate to "Other fields"
There, you now see "related" with the possibilities to (i) navigate to the entry, (ii) add new related entries, (iii) remove related entries.
If you use crossref, JabRef will move these entries first in the bibliography as otherwise BibTeX cannot use the information of the cross-referenced fields. See also http://tex.stackexchange.com/a/148978/9075.
Please note that biblatex treats crossref differently than BibTeX.
citedBy - this is the opposite of cites. Use cites instead.
relations - this would introduce a complicated field similar to our save actions. A simple key/value is enough
references - stores all references in plain text (PRVV plugin). Thus, we do not use it.
See https://github.com/koppor/jabref/issues/14 for the developer's discussion on the fields.
The biblatex source tab allows you to add and edit BibTeX entries by simply typing the desired content using correct BibTeX syntax. Advanced users may at times find this to be the speedier option. The required syntax is extensively described in "About BibTeX and its fields".
Additionally, here the data is shown "as is", which means special symbols that are usually supposed to be hidden or translated into readable form, may show regardless.
This information is outdated. Please help to improve it (how to edit a help page).
The entry editor opens from main window (table of entries). To open it for a specific entry, you can either:
double-click on the entry in the table of entries
select the entry and press Enter
select the entry and go to the menu View → Open entry editor
select the entry and press CTRL + E
Then you can modify the content of the entry (see below). When done, click on the top left-hand corner of the entry editor or press ESC to close the entry editor and go back to the table of entries.
In this panel you can specify all relevant information on a single entry. The entry editor checks the type of your entry, and lists all the fields that are required, and the ones that are optional, for referring the entry with BibTeX. In addition, there are several fields termed General fields, that are common to all entry types.
You can fully customize which fields should be regarded as required and optional for each type of entry, and which fields appear in the General fields tabs. See Customizing entry types for more information about this.
For information about how the fields should be filled out, see BibTeX help.
The entry editor contains six panels: Required fields, Optional fields, General, Abstract, Comments and Bib(la)TeX source, where General, Abstract and Comments can be customized (see Customizing general fields for details). Inside the three first panels, Tab and Shift + Tab are used to switch focus between the text fields.
Up to JabRef 4.1, the field was called "Review". The field name was changed to "Comments" as "Review" indicated some external reviews or some fundamental comments.
Switch panels by clicking on the tabs, or navigate to the panel to the left or right using the following key combinations: Ctrl + Tab or Ctrl + + switch to the tab to the right, and Ctrl + Shift + Tab or Ctrl + - switch to the tab to the left. You can also switch to the next or previous entry by pressing Ctrl + Shift + Down or Ctrl + Shift + Up, respectively, or by clicking the appropriate toolbar button.
BibTeX source (termed biblatex source in case of a biblatex library) shows how th entry will appear when the database is saved in BibTeX (or biblatex) format. If you wish, you can edit the source directly in this panel. When you move to a different panel, press Ctrl + S or close the entry editor, JabRef will try to parse the contents of the source panel. If there are problems, you will be notified, and given the option to edit your entry further, or to revert to the former contents.
Tip: If your database contains fields unknown to JabRef, these will be visible in the source panel.
Tip: the pdf and url fields support Drag and Drop operations. You can drop there an url from your browser. either a link to a pdf file (that JabRef can download for you) or you can keep the link.
When the contents of a field is changed, JabRef checks if the new contents are acceptable. For field types that are used by BibTeX, the contents are checked with respect to the use of the '#' character. The hash symbol is only to be used in pairs (except in escaped form, '\#'), wrapping the name of a BibTeX string that is referenced. Note that JabRef does not check if the referenced string actually exists (this is not trivial, since the BibTeX style you use can define an arbitrary set of strings unknown to JabRef).
If the contents are not accepted, the field will turn red, indicating an error. In this case the change will not be stored.
BibTeX supports string constants. One can define in the bibliography. JabRef offers editing of these strings via the String Editor.
For instance, if you see #jan# in the month field, the "real" BibTeX entry looks like month = jan. For more details, see Strings.
The entry editor offers autocompletion of words. In the File → Preferences → Autocomplete, you can enable or disable autocompletion, and choose for which fields autocompletion is active.
With autocompletion, JabRef records all words that appear in each of the chosen fields throughout your database. Whenever you write the beginning of one of these words, it will be suggested visually. To ignore the suggestion, simply write on. To accept the suggestion, either press Enter or use your arrow keys or other keys to remove the selection box around the suggested characters.
Note: the words considered for suggestion are only the ones appearing in the same field in entries of the same database as the one you are editing. There are many ways to realise this kind of feature, and if you feel it should have been implemented differently, we'd like to hear your suggestions!
The entry editor allows for file(s) to be dragged and dropped directly into the entry editor window. JabRef follows the default behavior of your operating system and uses Modifier keys to distinguish the drag and drop options. Copy means the entry editor will create a copy of the file in the current directory. The keyboard shortcuts needed to move, copy or link files are the following: Move means, the entry will move the file to the defined file directory, and rename the file according to the filename and file directory patterns. Link means the entry editor will create a link to the file. This creates a shortcut to the file and will not copy the file to the current directory.
Move: Ctrl + Drag (Windows) or Option + Drag (MacOS/Linux)
Copy: Shift + Drag (Windows) or Command + Drag (MacOS/Linux) or no key + Drag
Link: Alt + Drag (Windows) or Command + Option + Drag (MacOS/Linux)
Pressing Ctrl + K or the 'key' button causes the citation key for your entry including the surrounding to be copied to the clipboard.
Pressing Ctrl + Shift + K causes the citation key for your entry to be copied to the clipboard.
Press Ctrl + G or the 'gen key' button (the magic wand) to autogenerate a citation key for your entry based on the contents of its required fields.
For more information on how JabRef generates citation keys, see Customizing the citation key generator.
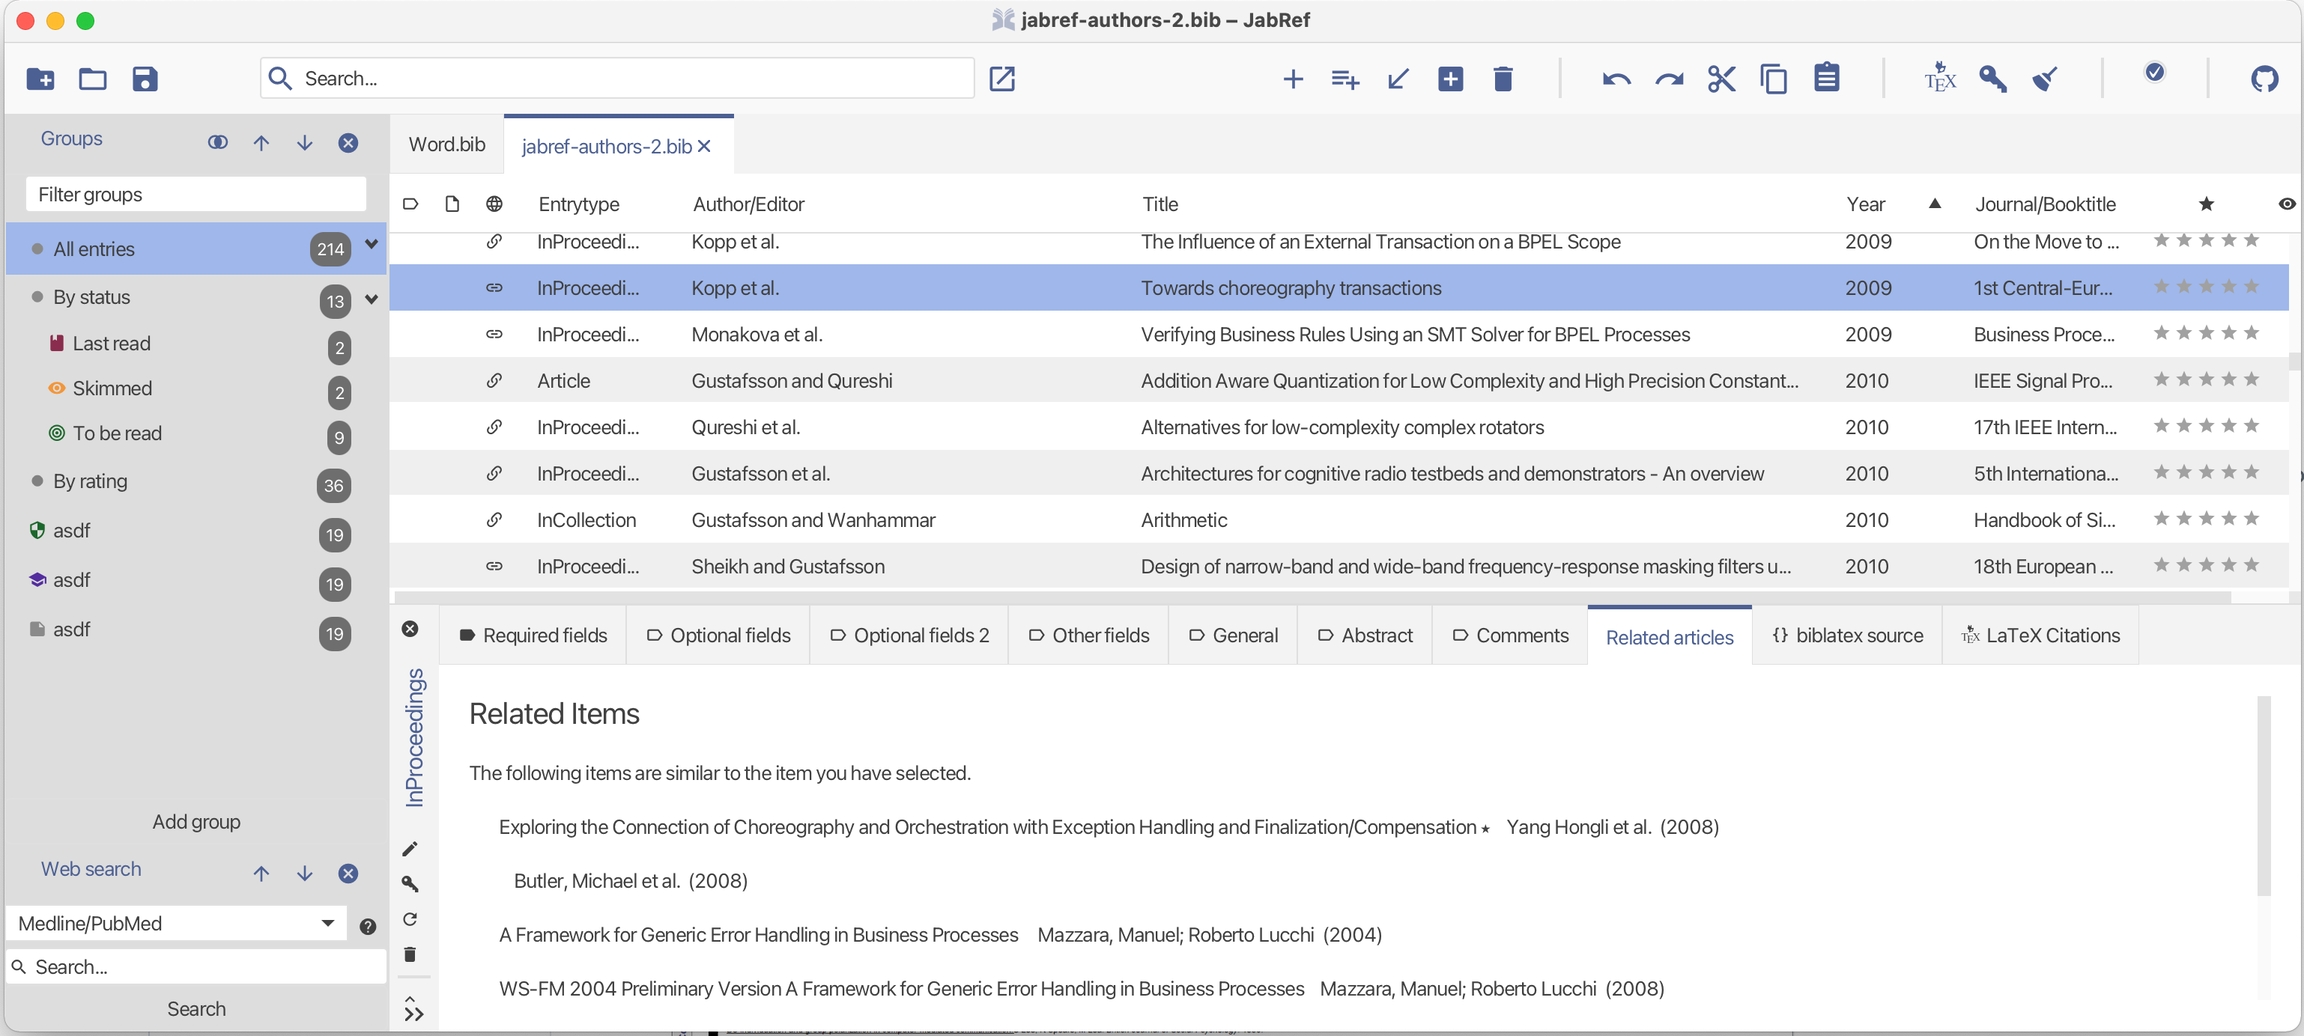
By selecting this Tab, we are sending the title of the selected paper to Mr. DLib.
Mr. DLib is a service that calculates recommendations for you based on this title. After a short loading time the recommendations are listed in the Related Articles Tab. For detailed information see Mr. DLibs help page. The following image shows the Related Articles Tab with recommendations to the selected item.
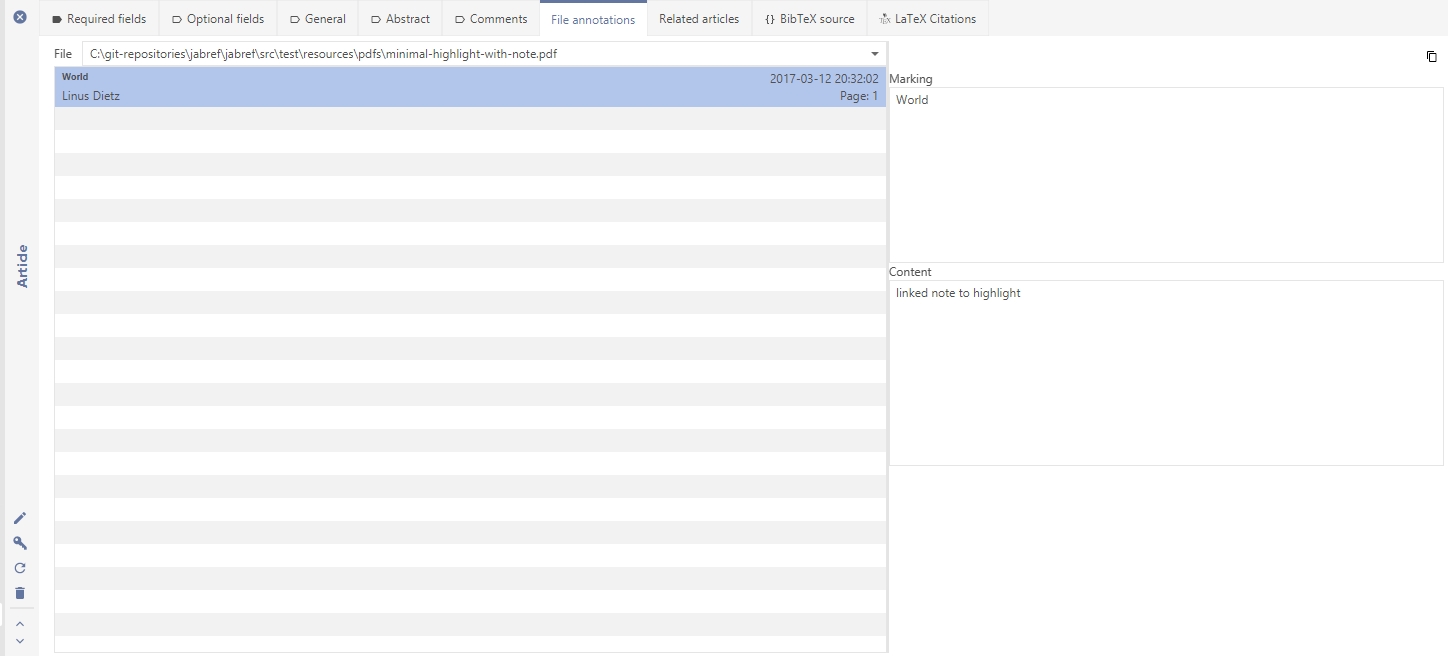
JabRef can display the content of annotations in PDFs linked to an entry.
Mark or annotate something in a linked PDF.
In the entry editor, you can now select the tab "File annotations" and you will see the content you have highlighted or commented on in the PDF.
If you have multiple PDFs linked to the entry, you can select the document as well in the File Annotation tab.
JabRef can optionally set a field to contain the date an entry was added to the database.
You can disable or enable this feature by entering File → Preferences → General, and selecting/deselecting the line 'Mark new entries with addition date'.
If an entry with a timestamp is pasted or imported, the field is updated with the current date if 'Overwrite' is checked. The value of the timestamp field will be updated upon changes in the entry if 'Update timestamp on modification' is checked.
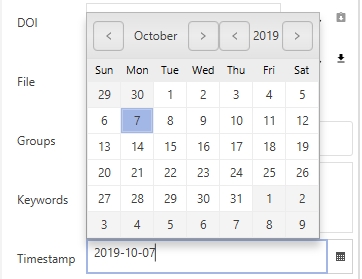
By default, the date is added in a field called 'timestamp', which is visible in the General fields tab in the entry editor. You can alter the name of this field. The date format can also be customized (see below).
The timestamp field can be edited in the General fields tab of the entry editor. If you do not see these fields, enable them at General Fields or reset your preferences.
You can manually alter the value by typing in the date and time of your choice. Also, by clicking on the calendar icon located at the right end of the field, you can select the date you want in a calendar.
The formatting of the time stamp is determined by a string containing designator words that indicate the position of the various parts of the date.
These are some of the available designator letters (examples are given in parentheses for Wednesday 14th of September 2005 at 5.45 PM):
yy: year (05)
yyyy: year (2005)
MM: month (09)
dd: day in month (14)
HH: hour in day (17)
mm: minute in hour (45)
These designators can be combined along with punctuation and whitespace. A couple of examples:
yyyy.MM.dd gives 2005.09.14
yy.MM.dd gives 05.09.14
yyyy.MM.dd HH:mm gives 2005.09.14 17:45

