Loading...
Loading...
Loading...
Loading...
Loading...
Loading...
Loading...
JabRef allows sharing both Bib(La)TeX library and SQL database. You can also export your library to a variety of formats.
The order of the exported entries can be set in File → Preferences, tab File, under the menu "Export sort order".
This help page should describe the menu File -> Export (and the various file formats available).
Please, populate this page. Visit our page about how to edit a help page.
See also:
JabRef is able to support collaborative work using a shared SQL database.
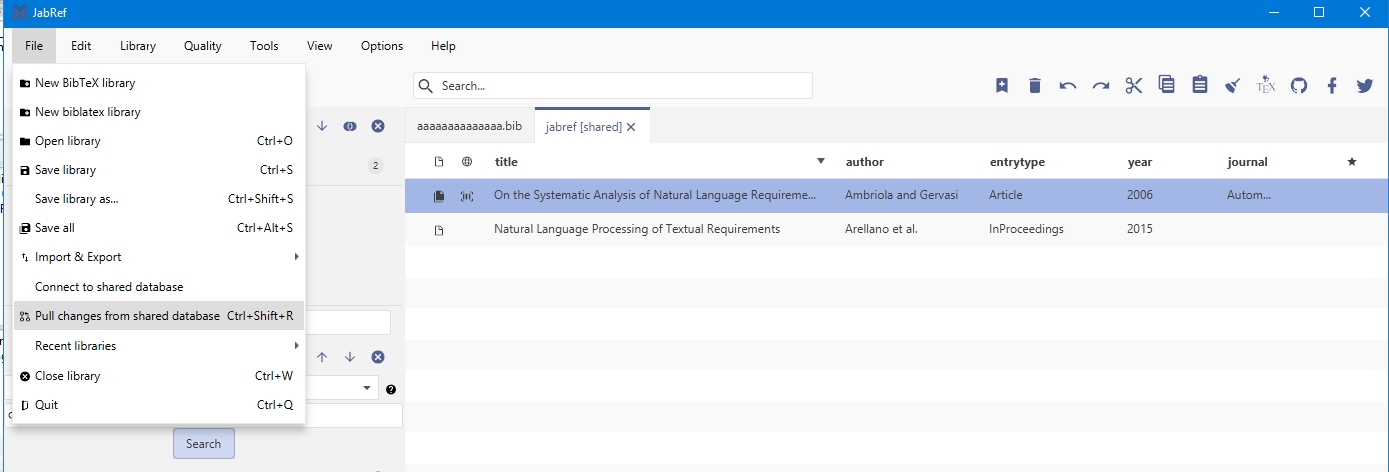
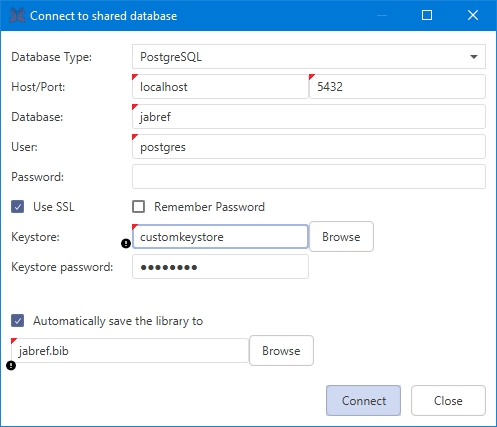
To use this feature you have to connect to a remote database. To do so you have to open File in the menu bar and then click the Connect to shared database item. The Connect to shared database dialog will open and you will have to fill in the shared's database connection settings. Under the field Database type you can choose between PostgreSQL (at least version 9.1), MySQL (at least 5.5, not recommended, because there is no live synchronization), and Oracle depending on your shared database. Then, you have to fill out the remaining fields with the according information. If you like you can save your password by clicking the Remember password? checkbox.
Since version 5.0 JabRef supports secure SSL connection to the database. For PostgreSQL make sure the server supports SSL and you have correctly setup the certificates. Then convert the client certificates into a java readable format and import them into a (custom) keystore. For MySQL the procedure is similar. Setting up MySQL with SSL and converting the certificates for the java keystore. However, it has only been tested with PostgreSQL. Once the certificates are imported into the keystore, specify the path to the keystore file in the connection dialog and the password for accessing the keystore.
After connecting to your shared database, your main window should look like this:
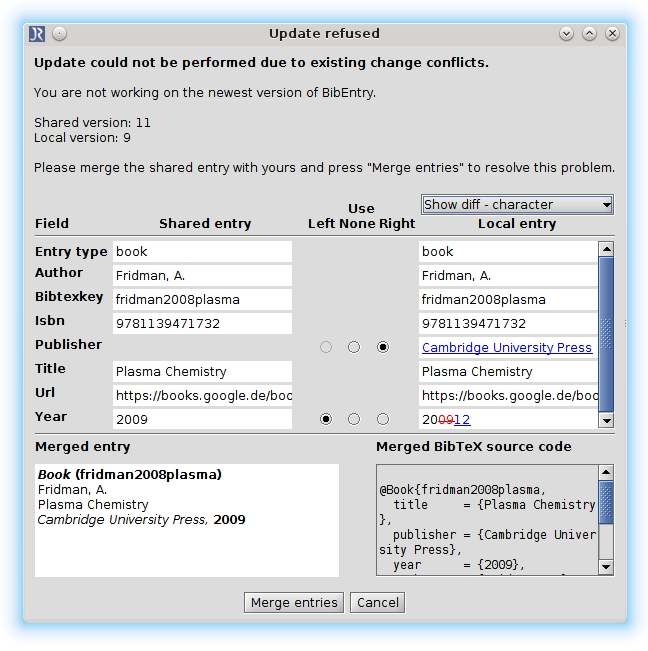
JabRef will automatically detect your changes and push them to the shared side. JabRef will also constantly check if there is a newer version available. If you experience connection issues, you can pull changes from your shared database via the icon in the icon bar. If a newer version is available, JabRef will try to automatically merge the new version and your local copy. If this fails, the Update refused dialog will show up. You will then have to manually merge using the Update refused dialog. The dialog helps you by pointing out the differences, you then will have to choose if you want to keep your local version or update to the shared version. Confirm your merge by clicking on Merge entries.
The Update refused dialog can also take a different form, if the BibEntry you currently work on has been deleted on the shared side. You can choose to keep the BibEntry in the database by clicking Keep or update to the shared side and click Close.
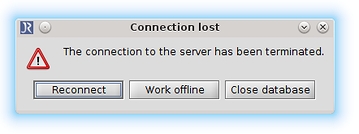
If you experience a problem with your connection to your shared database, the Connection lost dialog will show up. You can choose to Reconnect, Work offline or Close database. Most of the time simply reconnecting will fix this problem, if that's not the case you will have to choose between Work offline or Close database. Pick Work offline if you want to make sure your changes are saved. If you think there is nothing to save just pick Close database. If you choose to work offline, JabRef will convert the shared database to a local .bib database. Since you are no longer working online, but instead on a local database, you will have to import your work via copy and paste into the shared database. However before you import it into the shared database, make sure to check if changes happened during your offline time. Otherwise you might override someone else's work.
You can test the shared SQL database support by using https://www.freemysqlhosting.net for MySQL (not recommended) and https://www.elephantsql.com/ for PostgreSQL (recommended).
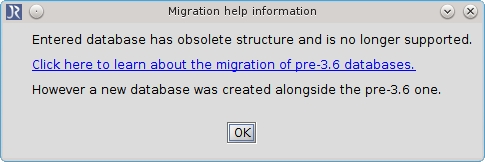
This situation occurs when you try to open an SQL database which was created with JabRef version older than 3.6.
With release of JabRef 3.6 the SQL database structure has changed. So all SQL databases with an pre-3.6 structure are no longer supported.
To migrate your pre-3.6 SQL database into new shared SQL database you have to follow these steps:
Download and install JabRef 3.5
Open JabRef and goto File -> Import from external SQL database
Enter required data and click on Connect
Choose the database which should be imported and press Import
Save the database locally (File -> Save database)
Turn back at least to JabRef 3.6
Goto: File -> Open shared database
Enter required data and click on Connect
Now goto File -> Import into current database
Choose the file you saved locally and import it
After that the content is available as a shared SQL database and you can work live on it. More information about the live editing.
JabRef allows you to send entries to third parties via email.
Select one or multiple entries
Choose Tools → Send as email in the menu
This will open your default email application and automatically paste the entries in their raw BibTeX format. Once your correspondents have received the email, they will be able to directly copy and paste the entries into JabRef (or use them in other ways).
Once Send as email is pressed, JabRef will also automatically open the folder of attached files, as long as the option automatically open folders of attached files is enabled at File → Preferences → External programs → Sending of emails. Attaching these files to your email is possible by dragging and dropping the PDF files into your favorite email application.
JabRef allows you to define and use your own export filters, in the same way as the standard export filters are defined. An export filter is defined by one or more layout files, which with the help of a collection of built-in formatter routines specify the format of the exported files. Your layout files must be prepared in a text editor outside of JabRef.
The custom export format of JabRef is an alternative to the Citation Style Language, which is an XML-based format to describe bibliographic rendering.
Existing public files are collected at https://layouts.jabref.org.
The only requirement for a valid export filter is the existence of a file with the extension .layout. To add a new custom export filter, open the dialog box File → Preferences, go to the section Custom export formats, and click on Add. A new dialog box will appear, allowing you to specify a name for the export filter (which will appear as one of the choices in the File type dropdown menu of the file dialog when you use the File → Export menu choice in the JabRef window), the path to the .layout file, and the preferred file extension for the export filter (which will be the suggested extension in the file dialog when you use the export filter). Note that if you intend to use the custom export filter also for "Copy...->Export to Clipboard" in the maintable, the extension must be one of the following: txt, rtf, rdf, xml, html, htm, csv, or ris.
To see examples of how export filters are made, look for the package containing the layout files for the standard export filters on our download page.
Regarding tool support, there is the Export-Filter Editor for Jabref to quickly create export filters.
Let us assume that we are creating an HTML export filter. While the export filter only needs to consist of a single .layout file, which in this case could be called html.layout, you may also want to add two files called html.begin.layout and html.end.layout. The former contains the header part of the output, and the latter the footer part. JabRef will look for these two files whenever the export filter is used, and if found, either of these will be copied verbatim to the output before or after the individual entries are written.
Note that these files must reside in the same directory as html.layout, and must be named by inserting .begin and .end, respectively. In our example export filter, these could look like the following:
html.begin.layout: <!DOCTYPE html><html> <body style="color:#275856; font-family: Arial, sans-serif;">
html.end.layout: </body></html>
The file html.layout provides the default template for exporting one single entry. If you want to use different templates for different entry types, you can do this by adding entry-specific .layout files. These must also reside in the same directory as the main layout file, and are named by inserting .entrytype into the name of the main layout file. The entry type name must be in all lowercase. In our example, we might want to add a template for book entries, and this would go into the file html.book.layout. For a PhD thesis we would add the file html.phdthesis.layout, and so on. These files are similar to the default layout file, except that they will only be used for entries of the matching type. Note that the default file can easily be made general enough to cover most entry types in most export filters.
Layout files are created using a simple markup format where commands are identified by a preceding backslash. All text not identified as part of a command will be copied verbatim to the output file.
An arbitrary word preceded by a backslash, e.g. \author, \editor, \title or \year, will be interpreted as a reference to the corresponding field, which will be copied directly to the output.
Often there will be a need for some preprocessing of the field contents before output. This is done using a field formatter - a java class containing a single method that manipulates the contents of a field.
A formatter is used by inserting the \format command followed by the formatter name in square braces, and the field command in curly braces, e.g.:
\format[ToLowerCase]{\author}
You can also specify multiple formatters separated by commas. These will be called sequentially, from left to right, e.g.
\format[ToLowerCase,HTMLChars]{\author}
will cause the formatter ToLowerCase to be called first, and then HTMLChars will be called to format the result. You can list an arbitrary number of formatters in this way.
The argument to the formatters, withing the curly braces, does not have to be a field command. Instead, you can insert normal text, which will then be passed to the formatters instead of the contents of any field. This can be useful for some fomatters, e.g. the CurrentDate formatter (described below).
Some formatters take an extra argument, given in parentheses immediately after the formatter name. The argument can be enclosed in quotes, which is necessary if it includes the parenthesis characters. For instance, \format[Replace("\s,_")]{\journal} calls the Replace formatter with the argument \s,_ (which results in the "journal" field after replacing all whitespace by underscores).
See below for a list of built-in export formatters.
Some static output might only make sense if a specific field is set. For instance, say we want to follow the editor names with the text (Ed.). This can be done with the following text:
\format[HTMLChars,AuthorFirstFirst]{\editor} (Ed.)
However, if the editor field has not been set - it might not even make sense for the entry being exported - the (Ed.) would be left hanging. This can be prevented by instead using the \begin and \end commands:
\begin{editor} \format[HTMLChars,AuthorFirstFirst]{\editor} (Ed.) \end{editor}
The \begin and \end commands make sure the text in between is printed if and only if the field referred in the curly braces is defined for the entry being exported.
A conditional block can also be dependent on more than one field, and the content is only printed when simple boolean conditions are satisfied. Three boolean operators are provided:
AND operator : &, &&
OR operator : |, ||
NOT operator : !
For example, to output text only if both year and month are set, use a block like the following: \begin{year&&month}Month: \format[HTMLChars]{\month}\end{year&&month}
which will print "Month: " plus the contents of the month field, but only if also the year field is defined.
As an example for the usage of the NOT operator, consider the following:
\begin{!year}\format[HTMLChars]{(no year)}\end{!year}
Here, "no year" is printed as output text if no year field is defined.
Note: Use of the \begin and \end commands is a key to creating layout files that work well with a variety of entry types.
If you wish to separate your entries into groups based on a certain field, use the grouped output commands. Grouped output is very similar to conditional output, except that the text in between is printed only if the field referred in the curly braces has changed value.
For example, let's assume I wish to group by keyword. Before exporting the file, make sure you have sorted your entries based on keyword. Now use the following commands to group by keyword:
\begingroup{keywords}New Category: \format[HTMLChars]{\keywords} \endgroup{keywords}
JabRef provides the following set of formatters:
Authors : this formatter provides formatting options for the author and editor fields; for detailed information, see below. It deprecates a range of dedicated formatters provided in versions of JabRef prior to 2.7.
CreateBibORDFAuthors : formats authors for according to the requirements of the Bibliographic Ontology (bibo).
CreateDocBookAuthors : formats the author field in DocBook style.
CreateDocBookEditors : formats the editor field in DocBook style.
CurrentDate : outputs the current date. With no argument, this formatter outputs the current date and time in the format "yyyy.MM.dd hh:mm:ss z" (date, time and time zone). By giving a different format string as argument, the date format can be customized. For example \format[CurrentDate]{yyyy.MM.dd} will give the date only, e.g. 2005.11.30.
DateFormatter : formats a date. With no argument, the date is given in ISO-format (yyyy-MM-dd), which is also the expected format of the input. The argument may contain yyyy, MM, and dd in any combination. For example \format[DateFormatter(MM/yyyy)]{\date} will output 07/2016 if the date field contains 2016-07-15.
Default : takes a single argument, which serves as a default value. If the string to format is non-empty, it is output without changes. If it is empty, the default value is output. For instance, \format[Default(unknown)]{\year} will output the entry's year if set, and "unknown" if no year is set.
DOIStrip : strips any prefixes from the DOI string.
DOICheck : provides the full url for a DOI link.
EntryTypeFormatter : camel case of entry types, so "inbook" -> "InBook".
FileLink(filetype) : if no argument is given, this formatter outputs the first external file link encoded in the field. To work, the formatter must be supplied with the contents of the "file" field.
This formatter takes the name of an external file type as an optional argument, specified in parentheses after the formatter name. For instance, \format[FileLink(pdf)]{\file} specifies pdf as an argument. When an argument is given, the formatter selects the first file link of the specified type. In the example, the path to the first PDF link will be output.
FirstPage : returns the first page from the "pages" field, if set. For instance, if the pages field is set to "345-360" or "345--360", this formatter will return "345".
FormatChars : This formatter converts LaTeX character sequences their equicalent unicode characters and removes other LaTeX commands without handling them.
FormatPagesForHTML : replaces "--" with "-".
FormatPagesForXML : replaces "--" with an XML en-dash.
GetOpenOfficeType : returns the number used by the OpenOffice.org bibliography system (versions 1.x and 2.x) to denote the type of this entry.
HTMLChars : replaces TeX-specific special characters (e.g. {\"{a}} or {\sigma}) with their HTML representations, and translates LaTeX commands \emph, \textit, \textbf, \texttt, \underline, \textsuperscript, \textsubscript, \sout into HTML equivalents.
HTMLParagraphs : interprets two consecutive newlines (e.g. \n \n) as the beginning of a new paragraph and creates paragraph-html-tags accordingly.
IfPlural : outputs its first argument if the input field looks like an author list with two or more names, or its second argument otherwise. E.g. \format[IfPlural(Eds.,Ed.)]{\editor} will output "Eds." if there is more than one editor, and "Ed." if there is only one.
JournalAbbreviator : The given input text is abbreviated according to the journal abbreviation lists. If no abbreviation for input is found (e.g. not in list or already abbreviated), the input will be returned unmodified. For instance, when using \format[JournalAbbreviator]{\journal}, "Physical Review Letters" gets "Phys. Rev. Lett."
LastPage : returns the last page from the "pages" field, if set. For instance, if the pages field is set to "345-360" or "345--360", this formatter will return "360".
NoSpaceBetweenAbbreviations : LayoutFormatter that removes the space between abbreviated First names. Example: J. R. R. Tolkien becomes J.R.R. Tolkien.
NotFoundFormatter : Formatter used to signal that a formatter hasn't been found. This can be used for graceful degradation if a layout uses an undefined format.
Number : outputs the 1-based sequence number of the current entry in the current export. This formatter can be used to make a numbered list of entries. The sequence number depends on the current entry's place in the current sort order, not on the number of calls to this formatter.
Ordinal : replaces numbers with ordinals so 1 is replaced with 1st etc.
RemoveBrackets : removes all curly brackets "{" or "}".
RemoveBracketsAddComma : removes all curly brackets "{" or "}". The closing curly bracket is replaced by a comma.
RemoveLatexCommands : removes LaTeX commands like \em, \textbf, etc. If used together with HTMLChars or XMLChars, this formatter should be called last.
RemoveTilde : replaces the tilde character used in LaTeX as a non-breakable space by a regular space. Useful in combination with the NameFormatter discussed in the next section.
RemoveWhitespace : removes all whitespace characters.
Replace(regexp,replacewith) : does a regular expression replacement. To use this formatter, a two-part argument must be given. The parts are separated by a comma. To indicate the comma character, use an escape sequence: ,
The first part is the regular expression to search for. Remember that any commma character must be preceded by a backslash, and consequently a literal backslash must be written as a pair of backslashes. A description of Java regular expressions can be found at vogella's repository.
The second part is the text to replace all matches with.
RisAuthors : to be documented.
RisKeywords : to be documented.
RisMonth : to be documented.
RTFChars : replaces TeX-specific special characters (e.g. {^a} or {"{o}}) with their RTF representations, and translates LaTeX commands \emph, \textit, \textbf into RTF equivalents.
ShortMonth : formats the month field to use 3 letter BibTeX strings (jan, feb, mar, apr, ...).
ToLowerCase : turns all characters into lower case.
ToUpperCase : turns all characters into upper case.
WrapContent : This formatter outputs the input value after adding a prefix and a postfix, as long as the input value is non-empty. If the input value is empty, an empty string is output (the prefix and postfix are not output in this case). The formatter requires an argument containing the prefix and postix separated by a comma. To include the comma character in either, use an escape sequence (,).
WrapFileLinks : See below.
XMLChars : replaces TeX-specific special characters (e.g. {^a} or {"{o}}) with their XML representations.
Authors formatterTo accommodate for the numerous citation styles, the Authors formatter allows flexible control over the layout of the author list. The formatter takes a comma-separated list of options, by which the default values can be overridden. The following option/value pairs are currently available, where the default values are given in curly brackets.
AuthorSort = [ {FirstFirst} | LastFirst | LastFirstFirstFirst ]
specifies the order in which the author names are formatted.
FirstFirst : first names are followed by the surname.
LastFirst : the authors' surnames are followed by their first names, separated by a comma.
LastFirstFirstFirst : the first author is formatted as LastFirst, the subsequent authors as FirstFirst.
AuthorAbbr = [ FullName | LastName | {Initials} | InitialsNoSpace | FirstInitial | MiddleInitial ]
specifies how the author names are abbreviated.
FullName : shows full author names; first names are not abbreviated.
LastName : show only surnames, first names are removed.
Initials : all first names are abbreviated.
InitialsNospace : as Initials, with any spaces between initials removed.
FirstInitial : only first initial is shown.
MiddleInitial : first name is shown, but all middle names are abbreviated.
AuthorPunc = [ {FullPunc} | NoPunc | NoComma | NoPeriod ]
specifies the punctuation used in the author list when AuthorAbbr is used
FullPunc : no changes are made to punctuation.
NoPunc : all full stops and commas are removed from the author name.
NoComma : all commas are removed from the author name.
NoPeriod : all full stops are removed from the author name.
AuthorSep = [ {Comma} | And | Colon | Semicolon | Sep=<string> ]
specifies the separator to be used between authors. Any separator can be specified, with the Sep=<string> option. Note that appropriate spaces need to be added around string.
AuthorLastSep = [ Comma | {And} | Colon | Semicolon | Amp | Oxford | LastSep=<string> ]
specifies the last separator in the author list. Any separator can be specified, with the LastSep=<string> option. Note that appropriate spaces need to be added around string.
AuthorNumber = [ {inf} | <integer> ]
specifies the number of authors that are printed. If the number of authors exceeds the maximum specified, the authorlist is replaced by the first author (or any number specified by AuthorNumberEtAl), followed by EtAlString.
AuthorNumberEtAl = [ {1} | <integer> ]
specifies the number of authors that are printed if the total number of authors exceeds AuthorNumber. This argument can only be given after AuthorNumber has already been given.
EtAlString = [ { et al.} | EtAl=<string> ]
specifies the string used to replace multiple authors. Any string can be given, using EtAl=<string>
If an option is unspecified, the default value (shown in curly brackets above) is used. Therefore, only layout options that differ from the defaults need to be specified. The order in which the options are defined is (mostly) irrelevant. So, for example,
\format[Authors(Initials,Oxford)]{\author}
is equivalent to
\format[Authors(Oxford,Initials)]{\author}
As mentioned, the order in which the options are specified is irrelevant. There is one possibility for ambiguity, and that is if both AuthorSep and AuthorLastSep are given. In that case, the first applicable value encountered would be for AuthorSep, and the second for AuthorLastSep. It is good practise to specify both when changing the default, to avoid ambiguity.
Given the following authors, "Joe James Doe and Mary Jane and Bruce Bar and Arthur Kay" ,the Authors formatter will give the following results:
Authors(), or equivalently, Authors(FirstFirst,Initials,FullPunc,Comma,And,inf,EtAl= et al.)
J. J. Doe, M. Jane, B. Bar and A. Kay
Authors(LastFirstFirstFirst,MiddleInitial,Semicolon)
Doe, Joe J.; Mary Jane; Bruce Bar and Arthur Kay
Authors(LastFirst,InitialsNoSpace,NoPunc,Oxford)
Doe JJ, Jane M, Bar B, and Kay A
Authors(2,EtAl= and others)
J. J. Doe and others
Most commonly available citation formats should be possible with this formatter. For even more advanced options, consider using the Custom Formatters detailed below.
WrapFileLinks formatterThis formatter iterates over all file links, or all file links of a specified type, outputting a format string given as the first argument. The format string can contain a number of escape sequences indicating file link information to be inserted into the string.
This formatter can take an optional second argument specifying the name of a file type. If specified, the iteration will only include those files with a file type matching the given name (case-insensitively). If specified as an empty argument, all file links will be included.
After the second argument, pairs of additional arguments can be added in order to specify regular expression replacements to be done upon the inserted link information before insertion into the output string. A non-paired argument will be ignored. In order to specify replacements without filtering on file types, use an empty second argument.
The escape sequences for embedding information are as follows:
\i : This inserts the iteration index (starting from 1), and can be useful if the output list of files should be enumerated.
\p : This inserts the file path of the file link.
\f : This inserts the name of the file link's type.
\x : This inserts the file's extension, if any.
\d : This inserts the file link's description, if any.
For instance, an entry could contain a file link to the file "/home/john/report.pdf" of the "PDF" type with description "John's final report". Using the WrapFileLinks formatter with the following argument:
\format[WrapFileLinks(\i. \d (\p))]{\file}
would give the following output:
John's final report (/home/john/report.pdf)
If the entry contained a second file link to the file "/home/john/draft.txt" of the "Text file" type with description 'An early "draft"', the output would be as follows:
John's final report (/home/john/report.pdf)
An early "draft" (/home/john/draft.txt)
If the formatter was called with a second argument, the list would be filtered. For instance:
\format[WrapFileLinks(\i. \d (\p),,text file)]{\file}
would show only the text file:
An early "draft" (/home/john/draft.txt)
If we wanted this output to be part of an XML styled output, the quotes in the file description could cause problems. Adding two additional arguments to translate the quotes into XML characters solves this:
\format[WrapFileLinks(\i. \d (\p),,text file,",")]{\file}
would give the following output:
An early "draft" (/home/john/draft.txt)
Additional pairs of replacements could be added.
If none of the available formatters can do what you want to achieve, you can add your own by implementing the net.sf.jabref.export.layout.LayoutFormatter interface. If you insert your class into the net.sf.jabref.export.layout.format package, you can call the formatter by its class name only, like with the standard formatters. Otherwise, you must call the formatter by its fully qualified name (including package name). In any case, the formatter must be in your classpath when running JabRef.
From JabRef 2.2, it is possible to define custom name formatters using the BibTeX-sty-file syntax. This allows ultimate flexibility, but is a cumbersome to write
You can define your own formatter in the preference tab "Name Formatter" using the following format and then use it with the name given to it as any other formatter
<case1>@<range11>@<format>@<range12>@<format>@<range13>...@@ <case2>@<range21>@... and so on.
This format first splits the task to format a list of author into cases depending on how many authors there are (this is since some formats differ depending on how many authors there are). Each individual case is separated by @@ and contains instructions on how to format each author in the case. These instructions are separated by a @.
Cases are identified using integers (1, 2, 3, etc.) or the character * (matches any number of authors) and will tell the formatter to apply the following instructions if there are a number of less or equal of authors given.
Ranges are either <integer>..<integer>, <integer> or the character * using a 1 based index for indexing authors from the given list of authors. Integer indexes can be negative to denote them to start from the end of the list where -1 is the last author.
For instance with an authorlist of "Joe Doe and Mary Jane and Bruce Bar and Arthur Kay":
1..3 will affect Joe, Mary and Bruce
4..4 will affect Arthur
* will affect all of them
2..-1 will affect Mary, Bruce and Arthur
The <format>-strings use the BibTeX formatter format:
The four letters v, f, l, j indicate the name parts von, first, last, jr which are used within curly braces. A single letter v, f, l, j indicates that the name should be abbreviated. If one of these letters or letter pairs is encountered JabRef will output all the respective names (possibly abbreviated), but the whole expression in curly braces is only printed if the name part exists.
For instance if the format is "{ll} {vv {von Part}} {ff}" and the names are "Mary Kay and John von Neumann", then JabRef will output "Kay Mary" (with two space between last and first) and "Neuman von von Part John".
I give two examples but would rather point you to the BibTeX documentation.
Small example: "{ll}, {f.}" will turn "Joe Doe" into "Doe, J."
Large example:
To turn:
"Joe Doe and Mary Jane and Bruce Bar and Arthur Kay"into
"Doe, J., Jane, M., Bar, B. and Kay, A."you would use
1@*@{ll}, {f}.@@2@1@{ll}, {f}.@2@ and {ll}, {f}.@@*@1..-3@{ll}, {f}., @-2@{ll}, {f}.@-1@ and {ll}, {f}.
When sharing a Bib(la)TeX library, JabRef automatically recognizes a change in the bib file on disk and notifies the user of it. This works well on network drives.
Note: the use of a version control system (SVN, git, etc.) is recommended as this will allow for reverting changes.
To make the sharing of a Bib(la)TeX library easier, it is recommended to set specific library properties. In the menu Library → Library properties:
Select UTF-8 as encoding.
Define a General file directory, which will be used to store shared PDF (and other) files.
Check Refuse to save the library before external changes have been reviewed.
Define a sort order (year, author, title is recommended)..
Check Enable save formatters, and defines these actions, to help enforcing a consistent format for the entries.

