Loading...
Loading...
Loading...
Loading...
Loading...
Loading...
Loading...
Loading...
Loading...
Loading...
Loading...
Loading...
Loading...
Loading...
Loading...
Loading...
Structure your bibliography to your needs
Groups allow structuring of bibliographic libraries in a tree-like way that is similar to organizing files on disk in directories and sub-directories. The two main differences are:
While a file is always located in exactly one directory, an entry may be contained in more than one group.
Groups may use certain criteria to dynamically define their content. New entries that match these criteria are automatically added to these groups. This feature is not available in common file systems, but in several Email clients (e.g. Thunderbird and Opera).
Selecting a group shows the entries contained in that group. Selecting multiple groups shows the entries contained in any group (union) or those entries common in all selected groups (intersection), depending on the current settings. All this is explained in detail below.
Group definitions are database-specific.
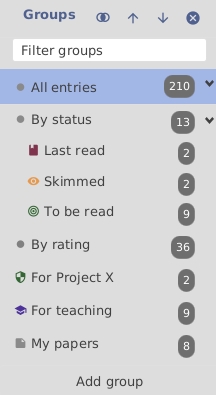
The group interface is shown in the side pane on the left of the screen. It can be toggled on or off by pressing Alt + 3 or by the menu View → Groups. The interface has several buttons, but most functions are accessed via a context menu (i.e. a right-click). Drag-and-drop is also supported.
To create a group and manually assign entries to it, press the Add group button located at the bottom of the pane, enter a name for the group, then press (leaving all values at their defaults). Now select the entries to be assigned to the group, and drag-and-drop them to the group (or use Add selected entries to this group in the context menu of the group interface). Finally, select the group to see its content. Only the entries you just assigned to the group should be displayed in the entry table.
You can also automatically fill a group based on keywords. For this, you need to use a different type of groups.
When you have numerous groups, the one of interest can be displayed by typing its name in the ''Filter groups'' field located near the top of the group pane.
Selecting one group shows the entries contained in that group (accounting for hierarchical settings).
When selecting several groups, you can intersect or unionize them: Union displays all the entries of the selected groups while Intersection displays all the entries shared among the selected groups.
For example, if you have a group for the author 'Smith' and another one for the author 'Doe', selecting the groups displays the entries that they co-authored if 'Intersection' is selected. If 'Union' is selected, the entries that at least one of them authored are displayed.
To test this, create two groups having some entries in common. Click the Intersection/Union button and make sure that Union is selected. Now select both groups. You should see all entries contained in any of the two groups. Click again on the Intersection/Union. This selects Intersection. Now you should see only those entries contained in both groups (which might be none at all if groups do not share entries, or exactly the same entries if both groups contain the same entries).
Just like directories, groups are structured like a tree, with the group All Entries at the root. By right-clicking on a group and selecting Add subgroup, you can add a subgroup to the selected group. The Add group button (at the bottom of the pane) lets you create a new subgroup of the group All Entries, regardless of the currently selected group(s). The context menu also allows removing groups and/or subgroups, and to sort subgroups alphabetically. Moving groups to a different location in the tree can be done by drag-and-drop.
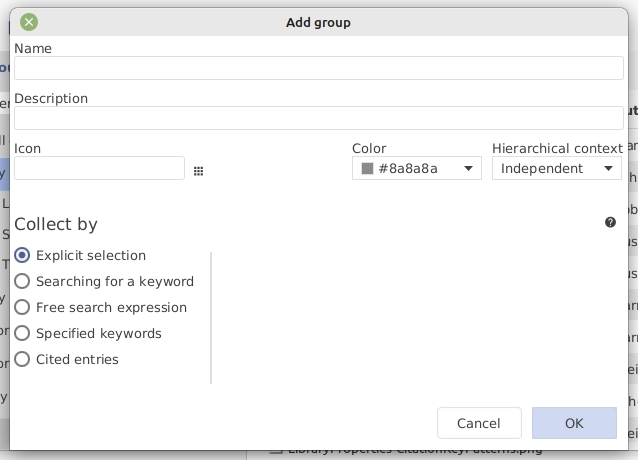
The properties of a group can be defined in the 'Edit group' dialog window (the same window is displayed when creating a new group). To modify the group properties, right-click on the group name in the group pane and select Edit group in the context menu.
Defines the name of the group, as displayed in the group pane.
A description of the group, to help you remember what it is about. This description is displayed when hovering the mouse over the group name.
An icon can be displayed in front of the group name. Choose your favorite icon among the ones available at https://materialdesignicons.com/, and enter its name of the field Icon (replacing any hyphens (-) with underscores (_)). The color of the icon can be set in the field Color.
The displayed entries depend on the hierarchical context of the group. When a group is selected, the displayed entries can be:
independent of its supergroup and of its subgroups.
a union between the entries of the group and of its subgroups.
an intersection between the entries of the group and of its supergroup.
By default, a group is independent of its position in the group's tree: When selected, the table of entries shows only the group's content (i.e. all of its entries).
For a group defined with a hierarchical context Intersection, only the entries contained in both the group and its supergroup are displayed when the group is selected.
This is especially relevant for groups based on keywords or search expression, where it is often useful to define a group that intersects its supergroup. For example, consider a supergroup containing entries with the keyword distribution and a subgroup containing entries with the keyword gauss. With the subgroup gauss defined as an intersection (of its supergroup), selecting the subgroup gauss displays entries that match both conditions, i.e. are concerned with Gaussian distributions. Note that entries that only belong to the subgroup gauss will not be shown, i.e. for an entry to be displayed when selecting gauss, it must be assigned to both the subgroup gauss and the supergroup distribution. By adding another intersection group for laplace to the supergroup distribution, the grouping can easily be extended to Laplace distributions.
The union of a group and its subgroups is the logical complement of the intersection: when defined as union, selecting the group displays both the group's own entries and its subgroups' entries.
For example, you can create a group for your references about music, and then subgroups about the music styles (classic, jazz, rock, etc.). By setting the group "Music" as union, when you subsequently add references to a subgroup, they will automatically appear in group "Music" as well (without additional action).
You can populate your Group pane by configuring JabRef to use the bibtex source's keywords = {...}, by clicking the + icon and following the previous instructions. You can nest subgroups by using the right chevron > (see here). You achieve this by editing the keywords = {...}, bibtex field in the entry source by placing > between any two keywords where the left-hand keyword is the parent group and the right-hand keyword will be its sub-group. The library entry will be placed there. Note: when you select + to do this, the first delimiter must be the right chevron, and the second must be whichever field separator you have configured (by default a comma ,).
If a refining group is a subgroup of a group that includes its subgroups -- the refining group's siblings --, these siblings are ignored when the refining group is selected.
JabRef has five types of groups:
Explicit selection. The group contains entries that were assigned manually. It behaves like a directory on disk, and contains only those entries that you explicitly assigned to it.
Searching for a keyword. The group contain entries in which a certain field (e.g. author) contains a certain keyword (e.g. Smith). This method does not require manual assignment of entries but uses information that is already present in the database.
Free search expression. Similar to Searching for a keyword, but for several keywords in several fields.
Specified keywords. This feature will gather all words found in a specific field of your choice, and create a group for each word.
Authors' last names. Groups can be generated for each author's last name.
Cited entries. The group contains the entries cited in a LaTeX document, based on its .aux file.
Groups based on explicit selection are populated only by manual assignment of entries.
After creating an explicit-selection group, you select the entries to be assigned to it and use either drag-and-drop or the context menu Add selected entries to this group of the group interface.
To remove entries from an explicit-selection group, select them and use the context menu Remove selected entries from this group of the group interface.
This method of grouping requires that all entries have a unique citation key. In case of missing or duplicate citation keys, the assignment of the affected entries cannot be correctly restored in future sessions.
This method groups entries in which a specified field (e.g. author) contains a specified keyword (e.g. Smith). The mentioned example will group all entries referring to the author Smith.
The search can be case-sensitive or not (checkbox 'Case sensitive'). The search can either be done as a plain-text or a regular-expression search (checkbox 'Regular expression').
Obviously, this will work only for entries including the specified grouping field, and the quality of the grouping will depend on the content accuracy.
The content of the group is updated dynamically whenever the database changes: JabRef allows to manually assign/remove entries to/from the group by simply appending/removing the search term to/from the content of the grouping field. For example, if you add the keyword A to an entry, this entry will be added to the dedicated group automatically. This makes sense only for the keywords field or for self-defined fields, but obviously not for fields like author or year.
This is similar to the above, but rather than search for a single search term on a single field, a search expression syntax can be used. It supports logical operators (AND, OR, NOT) and allows searching multiple fields.
For example, the search expression keywords=regression and not keywords=linear groups entries concerned with non-linear regression.
The content of the group is updated dynamically whenever the database changes.
With the group type "Specified keywords", you can quickly create a set of groups appropriate for your database. This feature will gather all words found in a specific field of your choice, and create a group for each word. This is useful for instance if your database contains suitable keywords for all entries. By auto-generating groups based on the keywords field, you should have a basic set of groups at no cost. If you have an entry with "keywords = {A, B}", then this group type creates subgroups "A" and "B" both containing the entry.
You can also specify characters to ignore, for instance, commas used between keywords. These will be treated as separators between words, and not part of them. This step is important for combined keywords such as laplace distribution to be recognized as a single semantic unit. (You cannot use this option to remove complete words. Instead, delete the unwanted groups manually after they were created automatically.)
The content of the group is updated dynamically whenever the database changes.
The group contains the entries cited in a LaTeX document, based on its '.aux' file. The .aux file has to be specified.
The content of the group is updated dynamically whenever the .aux file changes.
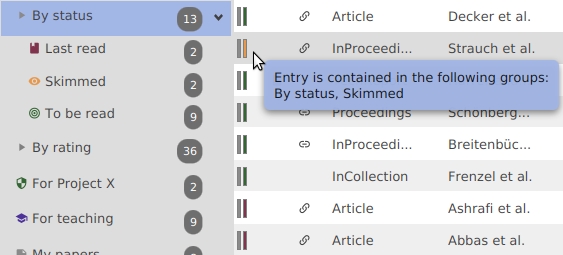
To see easily to which groups an entry belongs to, the entry table has a column dedicated to groups. For each entry, a set of color bars is displayed. The number of bars and their colors depend on the groups to which the entry belongs to.
By hovering the mouse on this column, you can see the list of groups to which an entry belongs to.
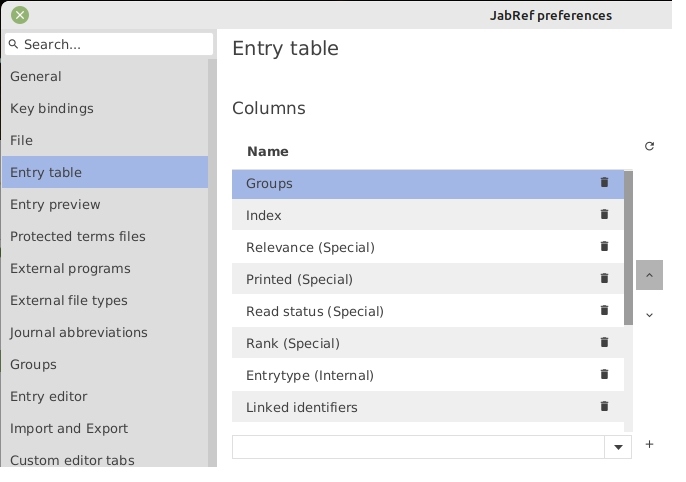
The "groups" column is displayed by default. Using the menu File → Preferences, tab Entry table, you can:
remove the "groups" column by clicking on the bin icon next to the item "Groups".
add the "groups" column by selecting the "Groups" item in the drop-down menu, and clicking on the + button located to the right of the drop-down menu.
When viewing the contents of selected group(s), a search can be performed within these contents using the regular search facility.
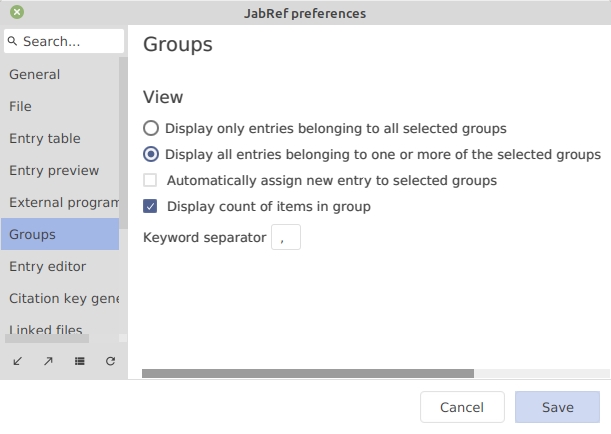
General preferences for groups can be accessed using File → Preferences, tab Groups.
When selecting multiple groups, you can choose to:
display only entries belonging to all selected groups (intersection)
display all entries belonging to one or more of the selected groups (union). This is the default option.
The checkbox "Automatically assign new entry go selected grouping" makes it possible to automatically assign new entries to selected groups. If checked (default), upon selection of one or more groups, all the new entries created will be assigned to the selected groups. This works both for entries created from the menu button or entries pasted from the clipboard. If unchecked, new entries are not assigned to groups automatically.
If checked (default), the number of entries in each group is displayed in the group name, at the right of the group pane.
Be careful, this can slow down JabRef when a library has numerous groups.
The character separating two keywords can be set in this field. The default keyword separator is a comma (,).
Groups are saved as a @COMMENT block in the .bib-file and are shared among all users (future versions of JabRef might support user-dependent groups).
Modify the content of an entry
Entry edition is done in the entry editor.
To open the entry editor for a specific entry, you can either:
double-click on the entry in the table of entries
select the entry and press Enter
select the entry and go to the menu View → Open entry editor
select the entry and press CTRL + E
Then you can modify the content of the entry. When done, click on the top left-hand corner of the entry editor or press ESC to close the entry editor and go back to the table of entries.
Qualify your entries with tags that make sense to your work.
A set of 6 special fields allows you to tag your entries in order to rate read papers, indicate their relevance to your work, indicate that their quality has been assured, etc. Internally, each special field is stored in a separate BibTeX field.
This feature has to be activated in File → Preferences → Entry Table by checking the item Enable special fields.
The status of each special field can be displayed in the table of entries as dedicated columns.
Like any other field, the special field columns can be turned on and off individually in File → Preferences → Entry Table.
You can see the value of a special field by:
clicking in the column.
a right-click on an entry.
the menu Edit.
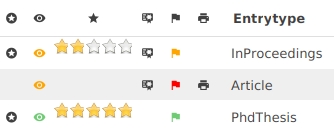
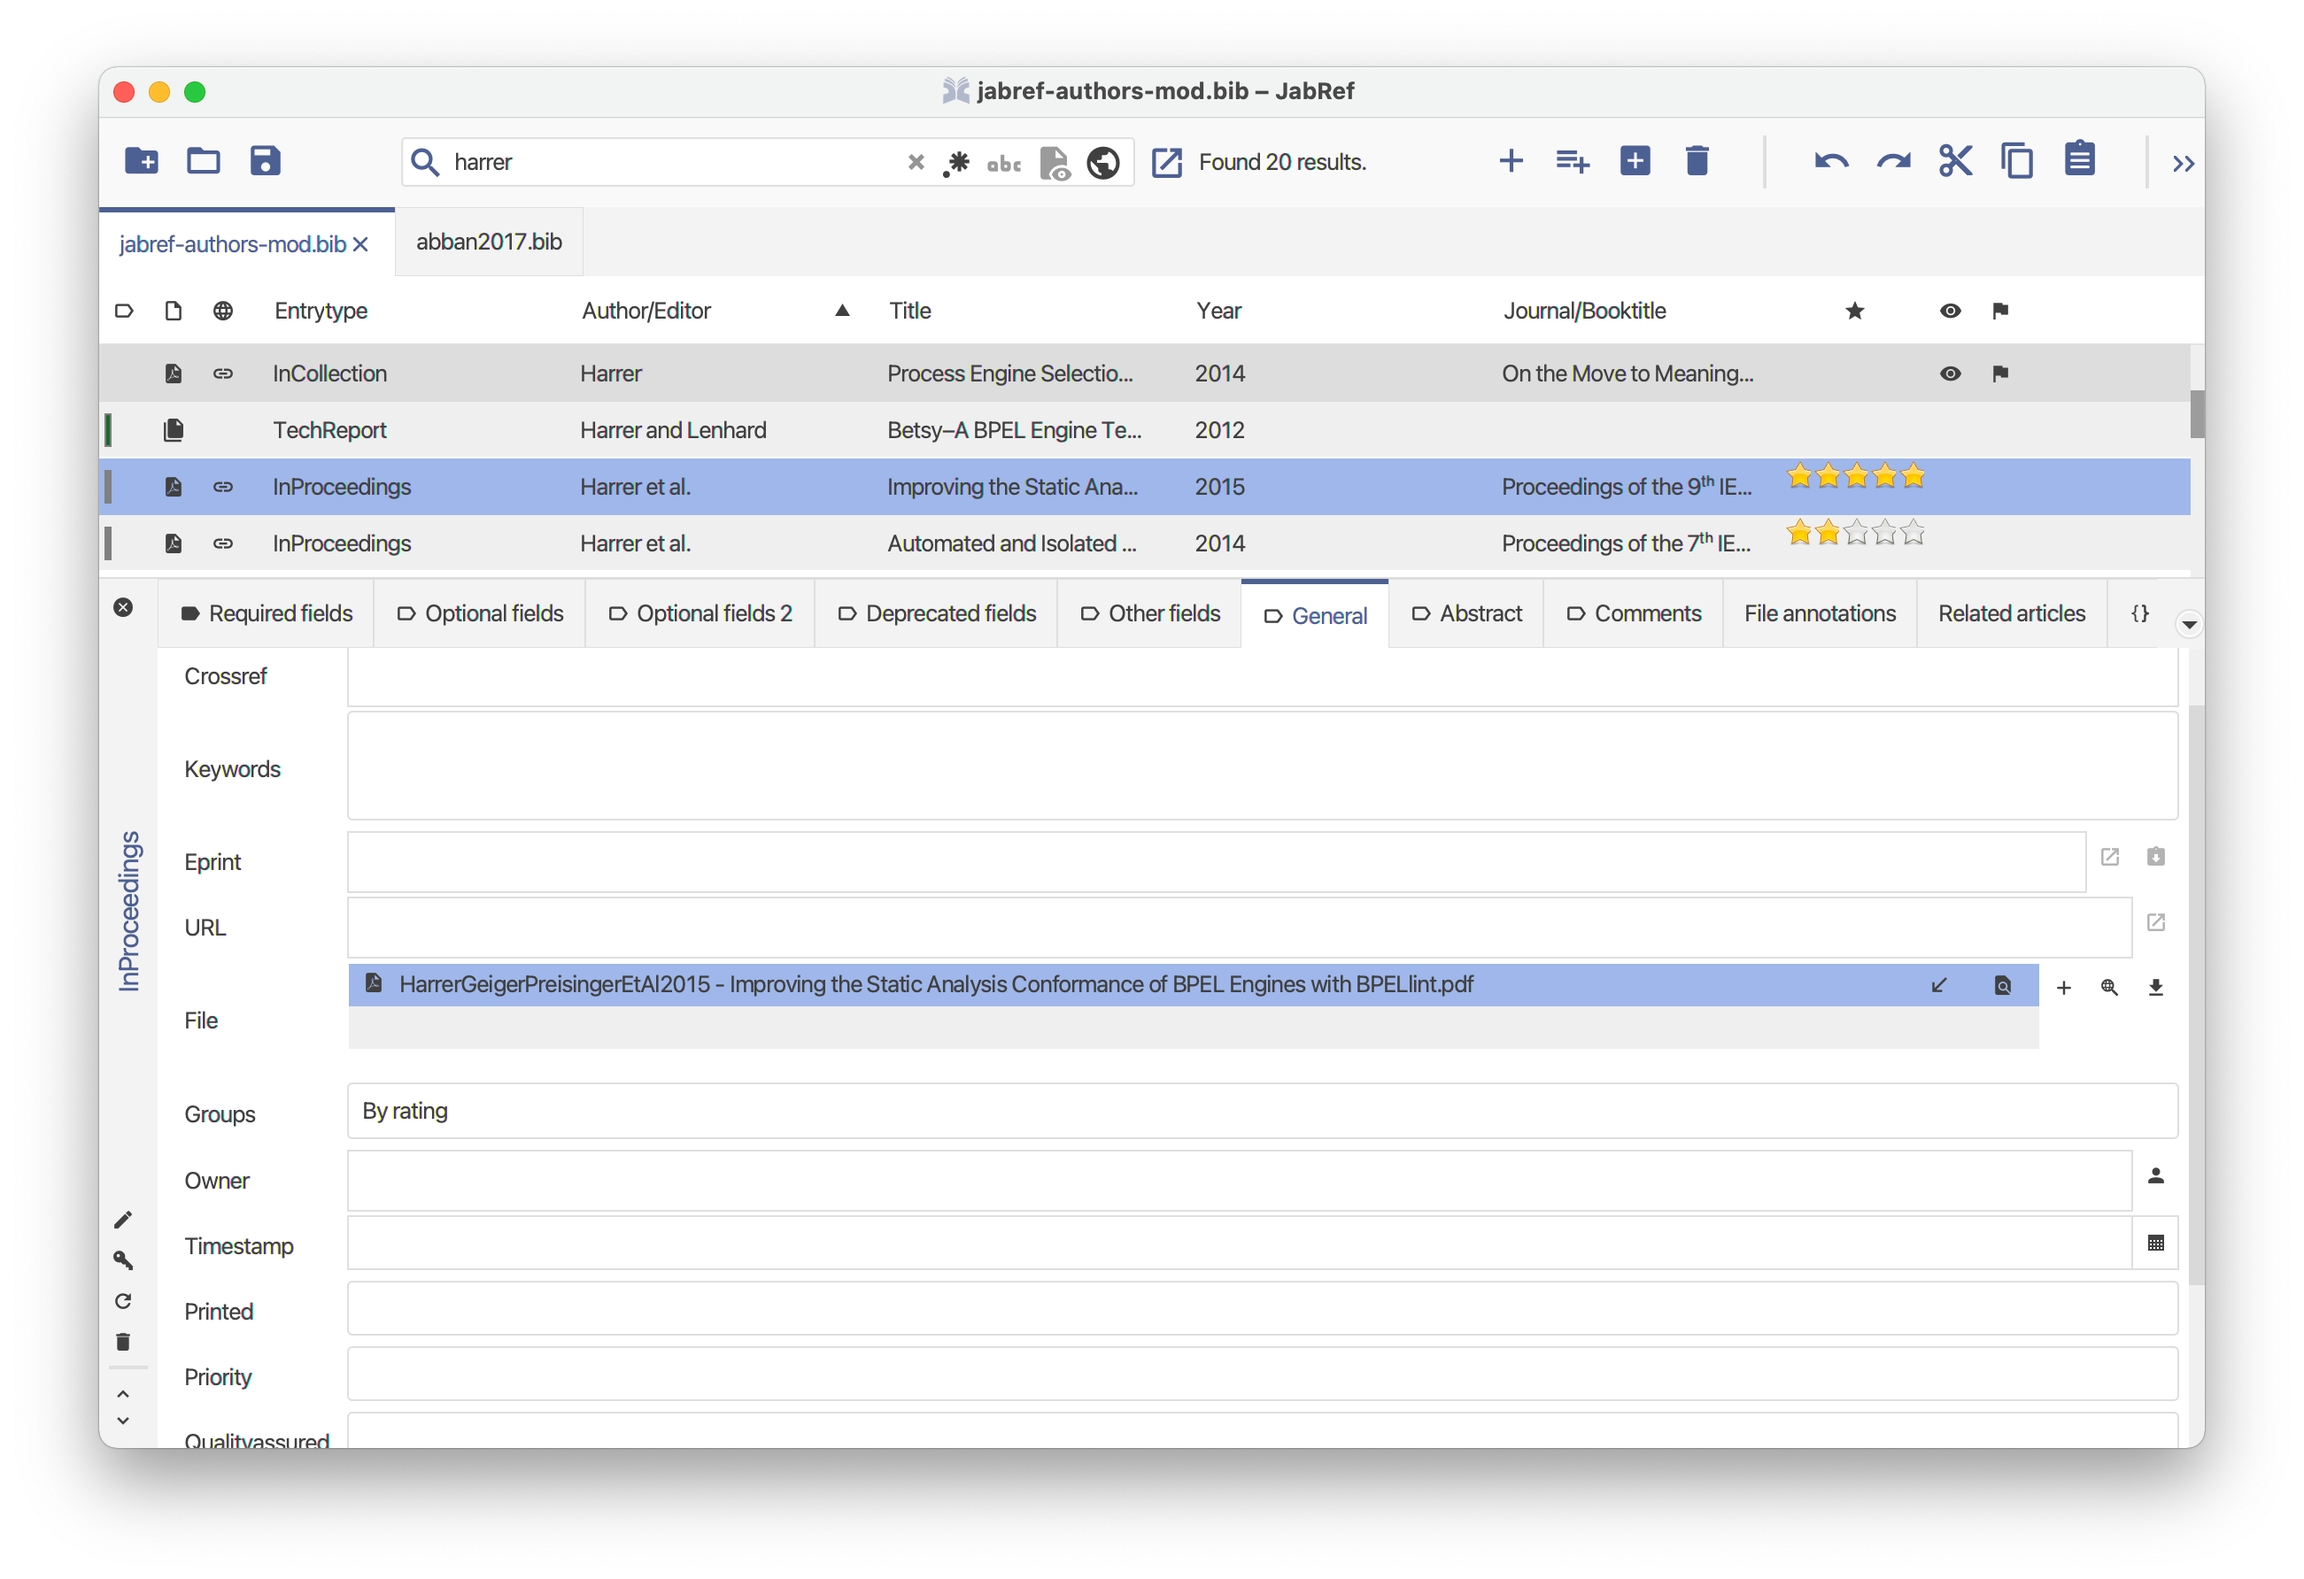
An entry can be marked as relevant: a black-and-white star is displayed (in the first column of the image below).
The read status can be set to "No" (no symbol in the column), to "Skimmed" (an orange eye), or to "read" (a green eye).
JabRef offers a rank from one to five yellow stars to rate your papers. By default, no rank is given.
An entry may be marked as quality assured (fourth column in the image below). For example, you can mark the entries for which a thorough check of the field contents has been done.
You can set the priority of an entry from low (red flag) to high (green flag). For example, you can use it to prioritize unread papers.
This field allows to state is the paper has been printed or not (sixth column in the image above).
Pre JabRef 5.2
The way the special fields are stored in the libraries can be set in File → Preferences → Entry Table.
2 modes of storage are available:
With Write values of special fields as separated fields (default configuration since version 5.2), each special field is stored in a separate field of the entry.
With Synchronize with keywords enabled, the values of the special fields are stored twice: in a separated field and as a keyword. Each change in a special field is reflected in the keyword field, and, vice versa, each change in a keyword leads to a change in the special field. Additionally, when loading a database or pasting a new entry, the keywords are used to set the special field values.
Keywords help you in organizing, sorting and searching your entries.
Keywords can be added to your entries in a specific field. In the entry editor, the keywords field is displayed in the General tab. There, you can add new keywords to an entry by typing it in. If auto-completion is activated for the field keywords (File → Preferences → Entry editor), suggestions are given based on existing keywords.
By default, the keyword separator is a comma. It can be redefined in the preferences (File → Preferences → Groups).
If some entries have a keyword separator differing from the prescribed one, you can use menu Edit → Find and replace. For example, you may want to replace semi-columns (;) by commas (,). Select the radio button "Limit to Fields" and type in "keywords" as the relevant field.
Additionally, the special field values (relevance, priority, etc.) can be added to the keywords field automatically. This will allow you to group, sort, and search your library based on the special field values. See in File → Preferences → Entry table the item "Special fields" and select "Synchronize with keywords".
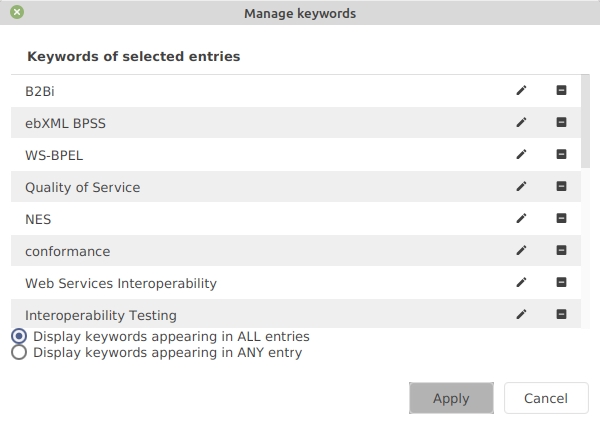
Select at least one entry and go to Edit → Manage keywords.
The keyword list is displayed in two modes:
the keywords shared by ALL of the selected entries.
the keywords appearing in ANY of the selected entries.
You can edit a keyword by double-clicking on it, or by clicking on the pencil icon. A keyword can be deleted by clicking on the minus icon.
To fasten the addition of often-used keywords, JabRef can store the list of your preferred keywords.
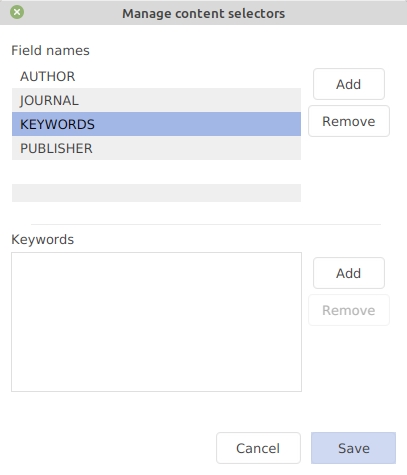
Go to File → Manage content selectors.
First, click on the field name "Keywords". Then, enter the list of your preferred keywords. Now, when you start to type one of your preferred keywords, JabRef will display a list of the matching ones (independently of the auto-completion). For more details, see the help section about Managing content selectors.
You can search for entries having specific keywords. For this, use a regular expression search, such as anykeyword matches apple or keywords = modell?ing. For more details, see the help section about Searching within the library.
Different types of groups can be created based on the values of the field keywords. See the help section about Groups.
Organizing your database with JabRef
JabRef is designed to facilitate your workflow.
You can select a subset of entries using the . Within a library, you can organize your entries in a tree-like structure made of .
You can add information to an entry using the , but JabRef can also for you. And JabRef takes care of the (PDF, etc.)
Once your database starts to be large, some tidy-up may be needed. JabRef can , , , help you in .
Hence, your database is always clean and up-to-date.
The search bar is located in the icon bar.
To make the cursor jump to the search field, you can:
Click in the search field.
Press Ctrl + F.
To find the search history, you can right click in the search field. Only ten recent searches will be displayed in the sub-menu. You can find clear history button under your search history.
At the right of the search text field, 2 buttons allow for selecting some settings:
Regular expressions
Case sensitivity
Whether or not the search query is case sensitive.
In a normal search, the program searches your library for all occurrences of the words in your search string, once you entered it. Only entries containing all words will be considered matches. To search for sequences of words, enclose the sequences in double-quotes. For instance, the query progress "marine aquaculture" will match entries containing both the word "progress" and the phrase "marine aquaculture".
All entries that do not match are hidden, leaving for display the matching entries only.
To stop displaying the search results, just clear the search field, press Esc or click on the "Clear" (X) button.
Make sure that the button "regular expressions" is activated
To search for entries whose author contains miller, enter: author = miller. The = sign is actually a shorthand for contains. Searching for an exact match is possible using matches or ==.
If the search term contains spaces, enclose it in quotes. Do not use spaces in the field specification! E.g to search for entries with the title "image processing", type: title = "image processing"
and, or and notTo search for entries with the title or the keyword "image processing", type: title|keywords = "image processing". To search for entries without the title or the keyword "image processing", type: title|keywords != "image processing" It is also possible to chain search expressions. In general, you can use and, or, not, and parentheses as intuitively expected:
(author = miller or title|keywords = "image processing") and not author = brown and != author = blue
The selection of field types to search (required, optional, all) is always overruled by the field specification in the search expression. If a field is not given, all fields are searched. For example, video and year == 1932 will search for entries with any field containing video and the field year being exactly 1932.
JabRef defines the following pseudo fields:
By default, regular expressions do not account for upper/lower casing. Hence, while the examples below are all in lower case, they match also upper- and mixed case strings.
If casing is important to your search, activate the case-sensitive button.
. means: any character
+ means: one or more times
author != .+ returns entries with empty or no author field.
^ means: the beginning of a line
[a-zA-Z] means: a through z or A through Z, inclusive (range)
$ means: the end of a line
X{n} means: X, exactly n times
owner != ^[a-zA-Z]{3}$ returns empty and non-three-letter owners
\b means: word boundary
\B means: not a word boundary
keywords = \buv\b matches uv but not lluvia (it does match uv-b however)
author = \bblack\b matches black but neither blackwell nor blacker
author == black does not match john black, but author = \bblack\b does.
author = \bblack\B matches blackwell and blacker, but not black.
? means: none or one copy of the preceding character.
{n,m} means: at least n, but not more than m copies of the preceding character.
[ ] defines a character class
title =neighbou?r matches neighbour and neighbor, and also neighbours and neighbors, and neighbouring and neighboring, etc.
title = neighbou?rs?\b matches neighbour and neighbor, and also neighbours and neighbors, but neither neighbouring nor neighboring.
author = s[aá]nchez matches sanchez and sánchez.
abstract = model{1,2}ing matches modeling and modelling.
abstract = modell?ing also matches modeling and modelling.
year == 200[5-9]|201[0-1]specifies the range of years 2005-2011 (200[5-9] specifies years 2005-2009;| means "or"; 201[0-1] specifies years 2010-2011).
author = (John|Doe)matches entries written by either John or Doe.
author = (John|Doe).+(John|Doe)matches entries written by both John or Doe.
()[]{}\^-=$!|?*+.)If a special character (i.e. ( ) [ ] { } \ ^ - = $ ! | ? * + . ) is included in your search string, it has to be escaped with a backslash, such as \} for }.
It means that to search for a string including a backslash, two consecutive backslashes (\\) have to be used: abstract = xori{\\c{c}}o matches xoriço.
")The character " has a special meaning: it is used to group words into phrases for exact matches. So, if you search for a string that includes a double quotation, the double quotation character has to be replaced with the hexadecimal character 22 in ASCII table \x22.
Neither a simple backslash \", nor a double backslash \\" will work as an escape for ". Neither author = {\"o}quist with regular expression disabled, nor author = \{\\\"O\}quist with regular expression enabled, will find anything, even if the name {\"o}quist exists in the library.
Hence, to search for {\"o}quist as an author, you must input author = \{\\\x22o\}quist, with regular expressions enabled (Note: the \, {, _ and the } are escaped with a backslash; see above).
Add comments on an entry
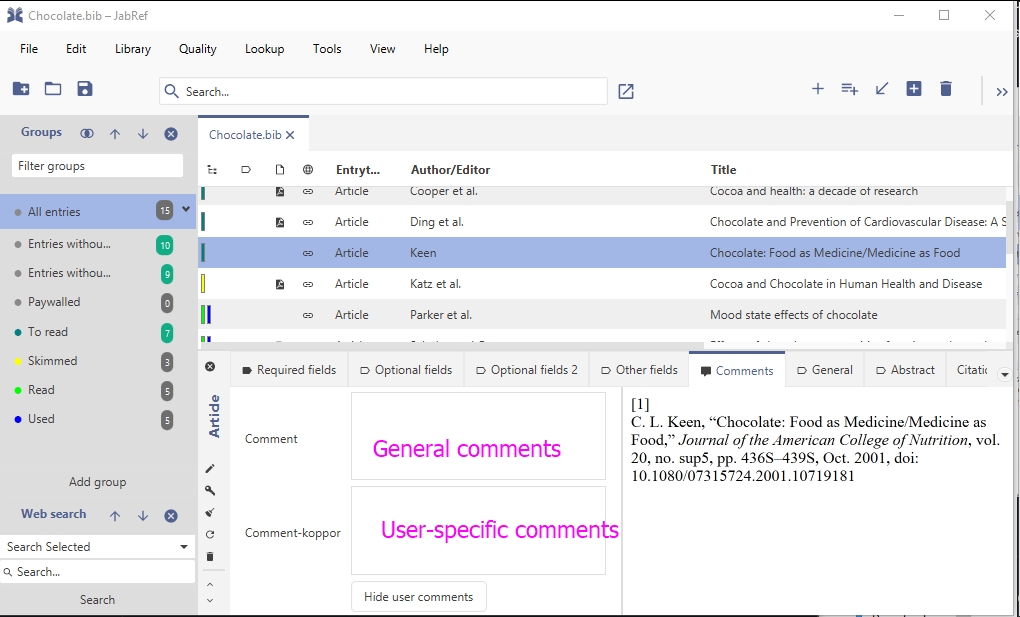
One can add free text to an entry. This is possible in the "Comments" tab of JabRef.
There is the general "comments" field.
JabRef offers to separate comments from as well as user-specific comments field.
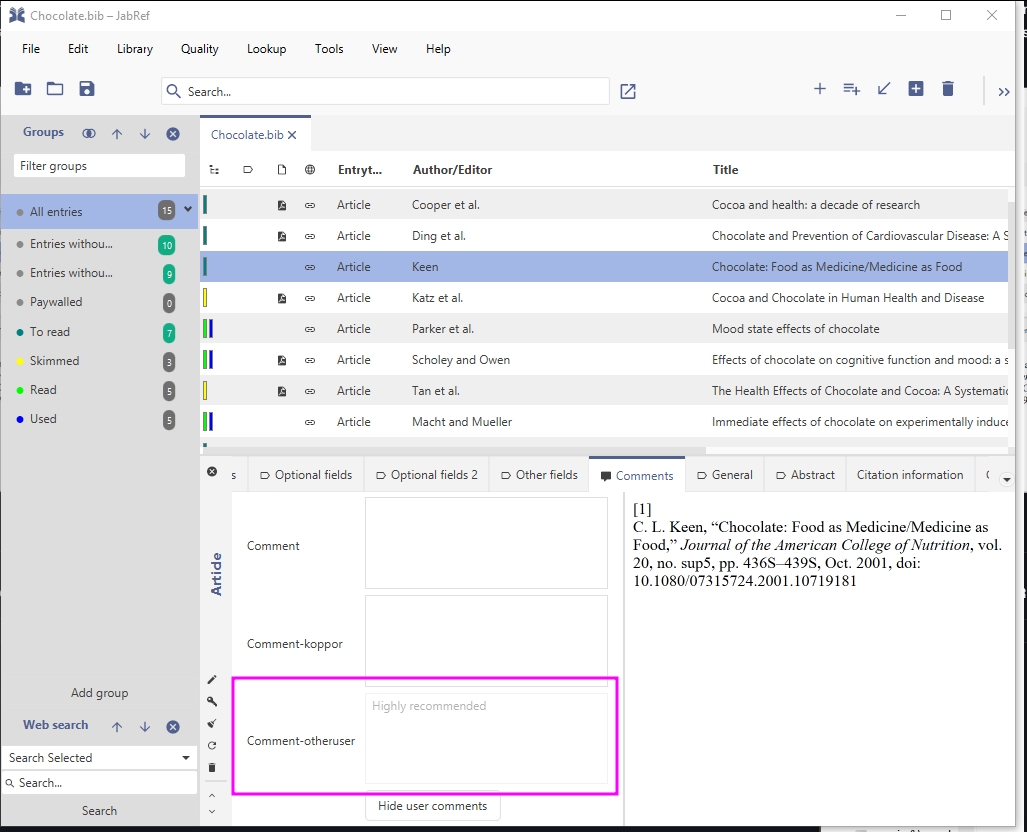
The following screenshots show the comments for the user koppor. As default, general comments are managed through the field comment. In addition, the field comment-koppor stores the comments of the user koppor.
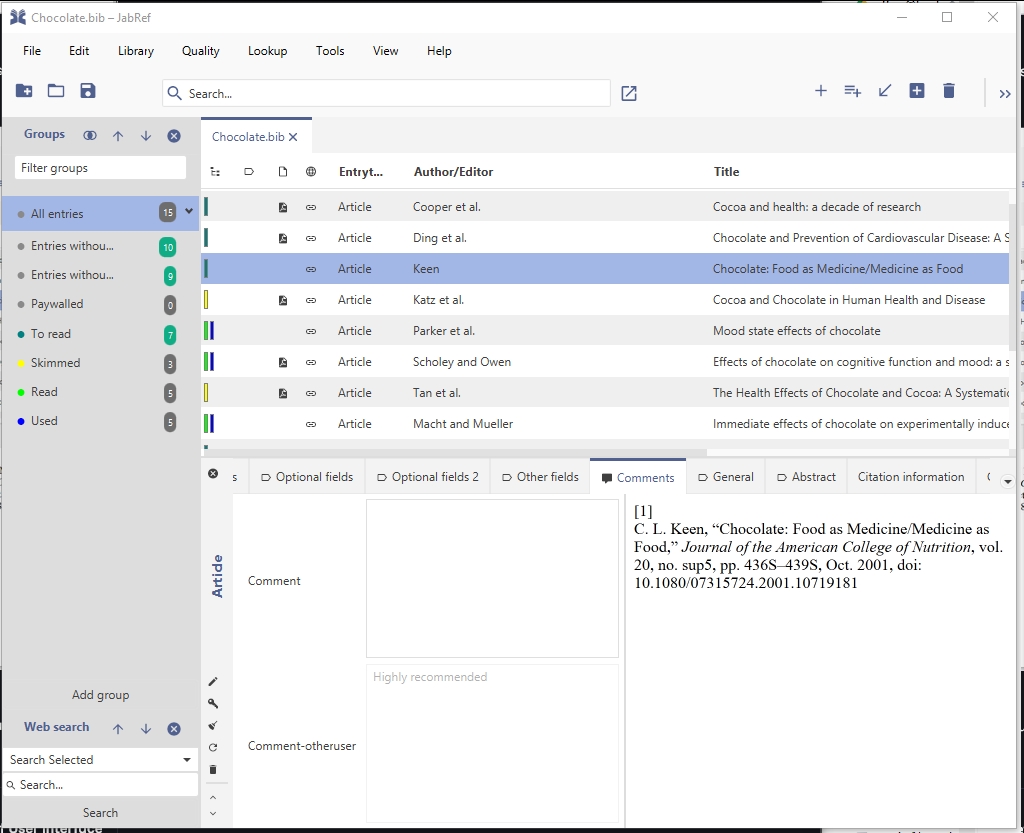
Now, lets assume, the library (.bib File) is shared among different users. koppor closed the library and opened it later again. He sees that a user otheruser has written a comment:
Now, koppor desides, that he does not want to add any comments in JabRef, so he pushes the "Hide user comments" button. Then, JabRef does not display the comment field for koppor's user any more:
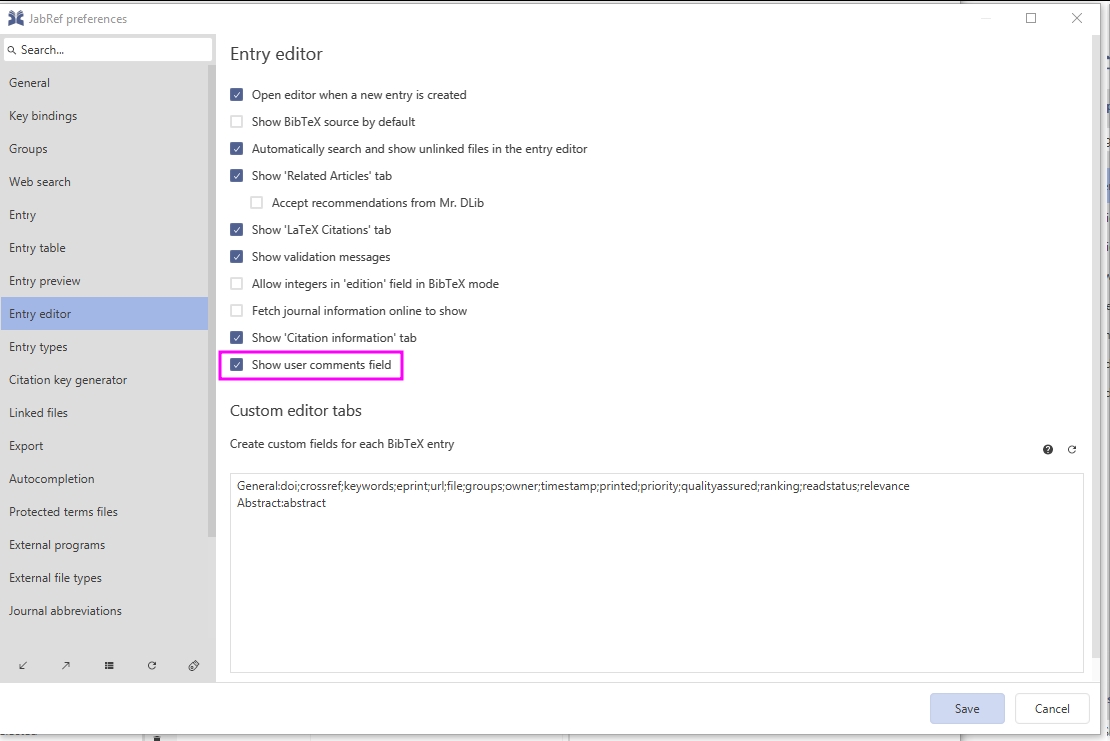
A bit later, koppor thinks, he wants to put comments again. To achieve that, he needs to navigate to File -> Preferences -> Entry editor. Then, he needs to add a checkmark to "Show user comment fields". then, he needs to press "Save" to save the preferences.
Then, JabRef's entry editor shows the field "Comment-koppor" again.
Tidy up your library
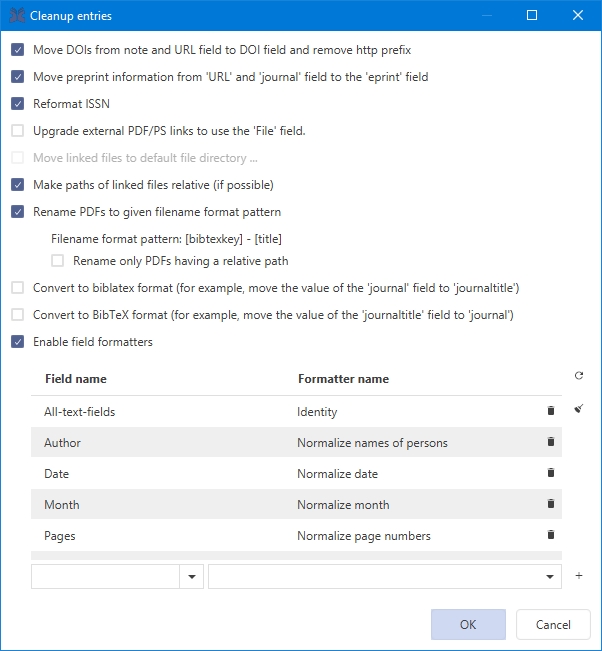
JabRef can cleanup the entries of a library. To do a cleanup of the entries, go to Quality → Cleanup entries. Then select the actions to be carried out.
under the tableEnable field formatters. Then, under the table, you can select using 2 drop-down menus:
an entry field (upon which the action will be applied).
the type of action to be carried out (such as HTML to LaTeX, which converts HTML code to LaTeX code, as described in the window). See the .
A click on the "circular arrow" icon enables a set of recommended formatting actions (the set of actions will depend on your database type: BibTeX or biblatex).
Whether or not the search query uses .
In order to only search for content within specific fields and/or to include logical operators in the search expression, a special syntax is available in which these can be specified. Both the field specification and the search term support .
Regular expressions (RegEx for short) define a language for representing patterns matching text, for example when searching. There are different types of RegEx languages. JabRef uses regular expressions as defined in Java. For extensive advanced information about Java's RegEx patterns, please have a look at the and at the .
XY
X followed by Y
X|Y
Either X or Y
(X)
X, as a capturing group
!=
tests if the search term is not contained in the field (equivalent to not ... contains ...)
Pseudo field
Purpose
Example
anyfield
Search in any field
anyfield contains fruit: search for entries having one of its fields containing the word fruit. This is identical to just writing apple. It may be more useful as anyfield matches apple, where one field must be exactly apple for a match.
anykeyword
Search among the keywords
anykeyword matches apple: search for entries which have the word apple among its keywords. However, as this also matches pineapple, it may be more useful in searches of the type anykeyword matches apple, which will not match apples or pineapple
key
Search for citation keys
citationkey == miller2005: search for an entry whose citation key is miller2005
entrytype
Search for entries of a certain type
entrytype = thesis: search entries whose type (as displayed in the entrytype column) contains the word thesis (which would be phdthesis and mastersthesis)
X?
X, once or not at all
X*
X, zero or more times
X+
X, one or more times
X{n}
X, exactly n times
X{n,}
X, at least n times
X{n,m}
X, at least n but not more than m times
X??
X, once or not at all
X*?
X, zero or more times
X+?
X, one or more times
X{n}?
X, exactly n times
X{n,}?
X, at least n times
X{n,m}?
X, at least n but not more than m times
X?+
X, once or not at all
X*+
X, zero or more times
X++
X, one or more times
X{n}+
X, exactly n times
X{n,}+
X, at least n times
X{n,m}+
X, at least n but not more than m times

Tidy up automatically your library each time you save it.
Field formats can be tidied up when saving the library. That ensures your entries to have consistent formatting. In Library → Library properties, check Enable save actions. You can now select the actions to be carried out using the 2 drop-down menus located under the table. Each action is defined by:
an entry field (upon which the action will be applied).
the type of action to be carried out (such as HTML to LaTeX, which converts HTML code to LaTeX code, as described in the window).
A click on the "circular arrow" icon enables a set of recommended formatting actions (the set of actions will depend on your library type: BibTeX or BibLaTeX).
Clears the field completely.
Escape underscores
Escapes ampersands.
Text & with &ersands ⇒ Text \& with \&ersands
Converts HTML code to LaTeX code.
Cleanup URL links.
http%3A%2F%2Fwikipedia.org ⇒ http://wikipedia.org
Converts HTML code to Unicode.
Cleans up LaTeX code:
Escape percent character (e.g.50% ⇒ 50\%)
Remove redundant $, {, and } (but not if the } is part of a command argument)
Move numbers, +, -, /, and brackets into equations
Move numbers followed by a space left of $ inside the equation (e.g. 0.35 $\mu$m)
Replace all @@ with $
Replace multiple spaces with a single space
Normalizes the date to ISO date format. Format date string to yyyy-mm-dd or yyyy-mm. Keeps the existing String if it does not match one of the following formats:
"M/y" (covers 9/15, 9/2015, and 09/2015)
"MMMM (dd), yyyy" (covers September 1, 2015 and September, 2015)
"yyyy-MM-dd" (covers 2009-1-15)
"d.M.uuuu" (covers 15.1.2015)
Normalize month to Bib(la)TeX standard abbreviation.
Normalizes lists of persons to the Bib(la)TeX standard. This separates authors by "and"s with first names after last name separated by a comma; first names are not abbreviated.
"John Smith" ⇒ "Smith, John"
"John Smith and Black Brown, Peter" ⇒ "Smith, John and Black Brown, Peter"
"John von Neumann and John Smith and Black Brown, Peter" ⇒ "von Neumann, John and Smith, John and Black Brown, Peter".
Normalize pages to Bib(la)TeX standard. Format page numbers, separated either by commas or double-hyphens. Converts the range number format to page_number--page_number. Removes unwanted literals except for letters, numbers, and -+ signs. Keeps the existing String if the resulting field does not match the expected Regex.
Converts ordinals to LaTeX superscripts, e.g. 1st, 2nd or 3rd. Will replace ordinal numbers even if they are semantically wrong, e.g. 21rd
1st Conf. Cloud Computing -> 1\textsuperscript{st} Conf. Cloud Computing
Removes braces encapsulating the complete field content.
Converts Unicode characters to LaTeX encoding.
Converts LaTeX to Unicode characters if possible.
$\acute{\omega}$ ⇒ ώ
Converts units to LaTeX formatting. This includes:
Add braces around the unit to keep case.
Replace hyphen with non-break hyphen
Replace space with a hard space
Remove protective braces from words.
{In} {CDMA} ⇒ In CDMA
Changes the first letter of all words to capital case and the remaining letters to lower case.
Changes all letters to lower case.
Capitalize the first word, changes other words to lower case.
Capitalize all words, but converts articles, prepositions, and conjunctions to lower case.
Changes all letters to upper case.
Shortens lists of persons if there are more than 2 persons to "et al.".
JabRef can fetch automatically additional information about your entries. It can even get the publication file!
To find identifiers (arxiv, DOI)_: select the entries and go to the menu Lookup → search document identifier online.
To find the DOI: open the entry editor, and in the General tab, click on the button Lookup DOI.
To find the document related to an entry: select the entry and to the menu Lookup → search full text documents online.
Be aware: The options above require your entry or entries to be filled with enough and correct bibliographic information. If the entry holds incomplete or inaccurate data, fetching the identifier or text document my fail.
JabRef can help you complement your entries with bibliographic data, which is associated with their registered DOI or ISBN. This is a very reliable way of obtaining correct bibliographic information and is very much recommended.
The following features require your entry to have a DOI or ISBN and are disabled / greyed out otherwise.
Option A) In the entry table, right-click on the entry to complement, and select the menu Get bibliographic data from DOI/ISBN/...
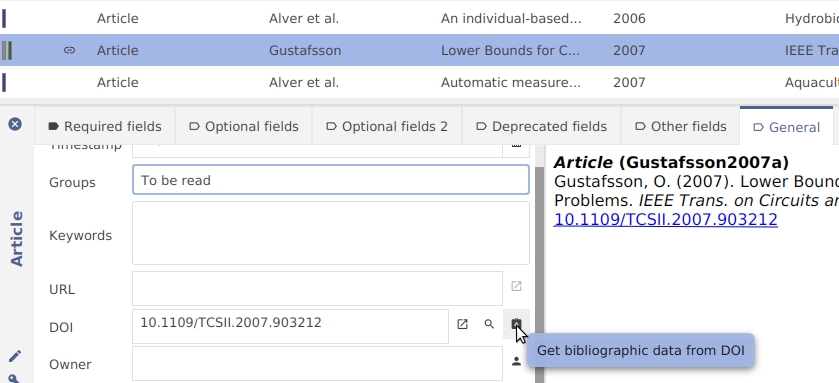
Option B) Open the entry editor, and in the General tab, click on the button Get bibliographic data from DOI
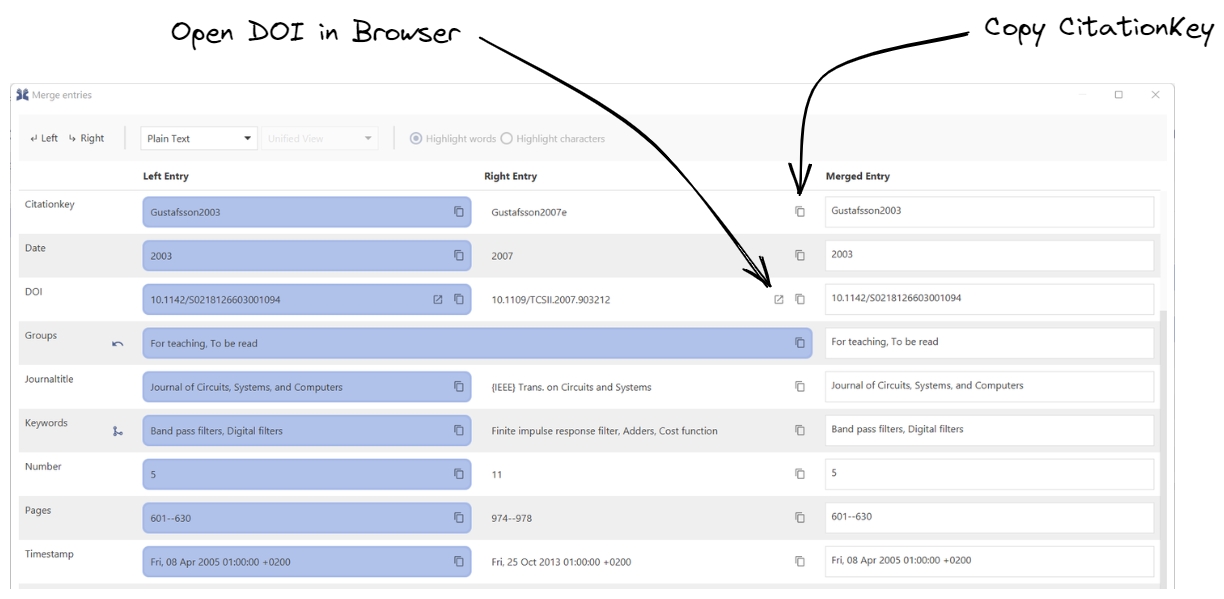
Using any of the options opens the window Merge entries:
There it is possible to choose what is kept for each field: the left side, the right side, or the merged entry. By default, the original entry (left) is kept, and any fields not present in the original entry are obtained from the information collected from the DOI.
Finally, after selecting which fields to keep, you can decide to Merge entries. Alternatively, you can press Cancel.
See also: Find duplicates, Merge entries
JabRef lets you link up your entries with files of any type stored on your system. Thereby, it uses the field file, which contains a list of linked files. Each entry can have an arbitrary number of file links, and each linked file can be opened quickly from JabRef. The fields url and doi are used as links to documents on the web in the form of a URL or a DOI identifier, respectively (see URL and DOI in JabRef).
In BibTeX/biblatex terms, the file links are stored as text in the field file. From within JabRef, however, they appear as an editable list of links accessed from the entry editor along with other fields.
If the "file" field is included in General fields, you can edit the list of external links for an entry in the Entry editor. The editor includes buttons for inserting, editing and removing links, as well as buttons for reordering the list of links.
JabRef offers the following directory settings:
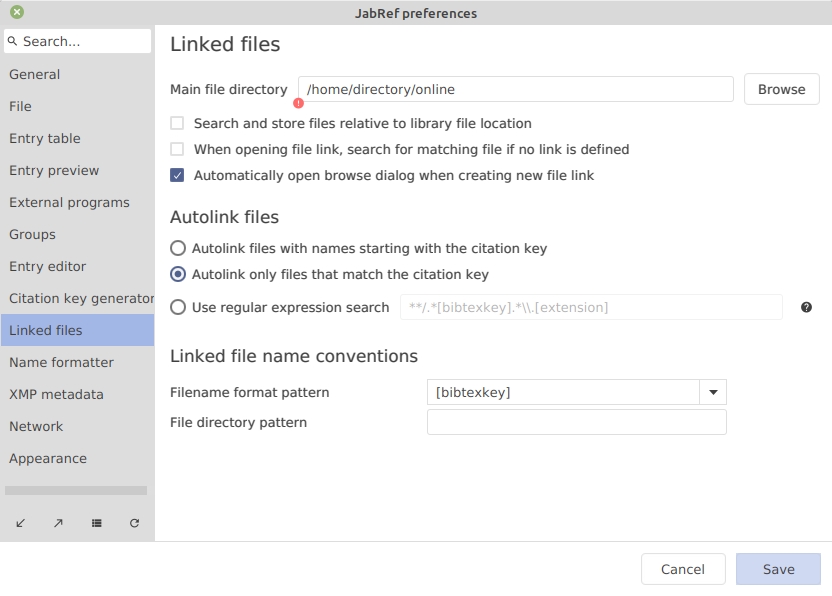
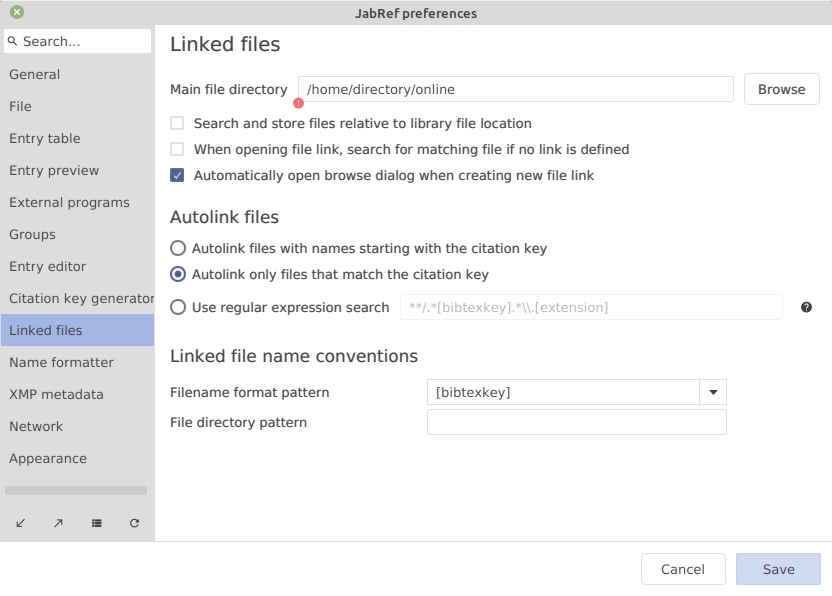
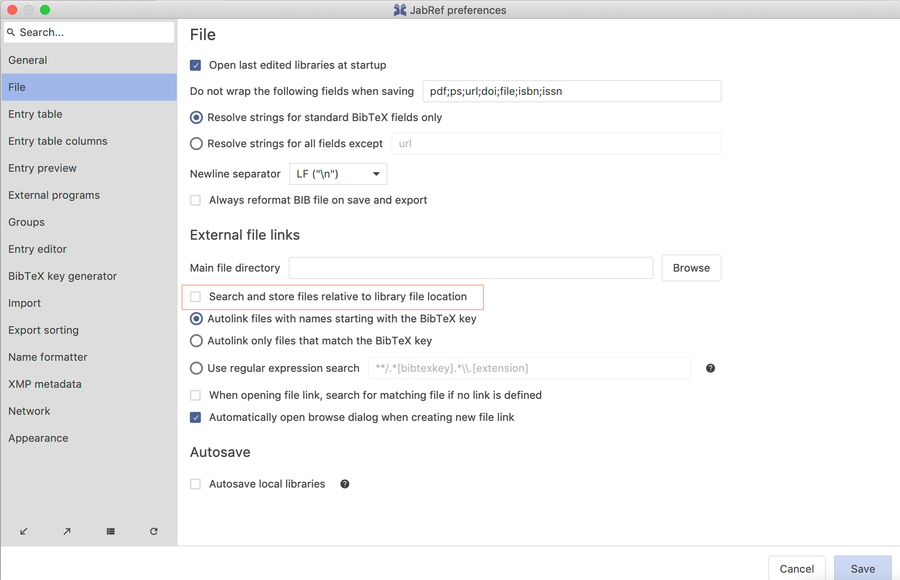
File → Preferences → Linked files, item Main file directory.
One of these settings is required. Mostly the "Main file directory" is enough.
JabRef uses these 3 directories to search for the files: JabRef starts in the user-specific file directory, then the general file directory, and, finally, the main file directory
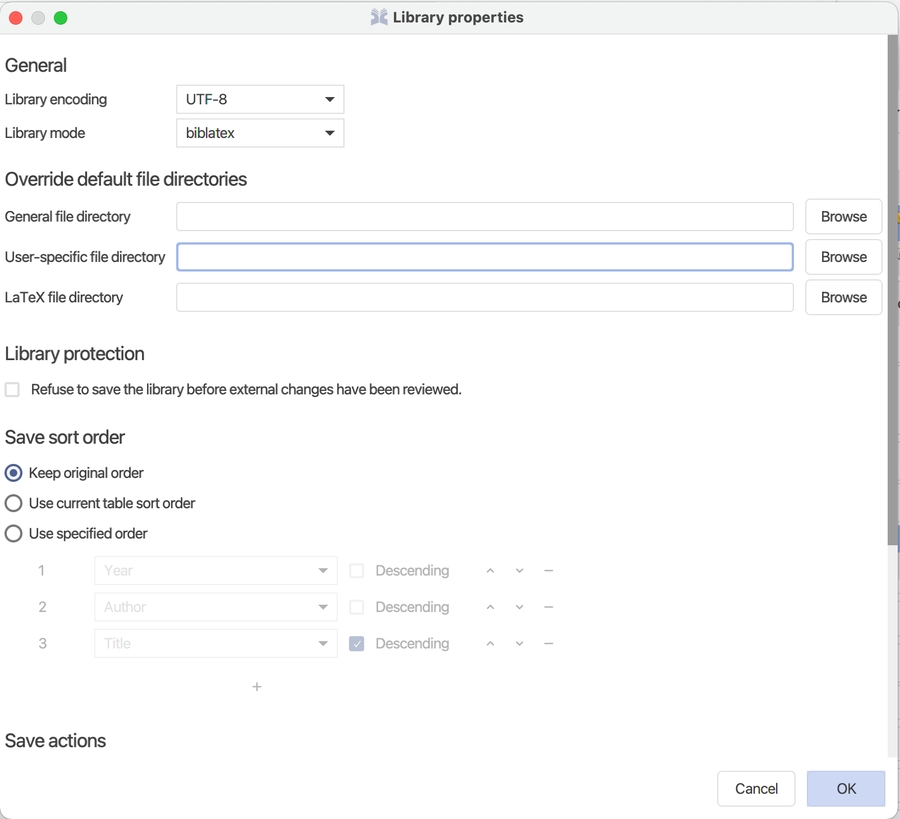
JabRef enables setting a directory per database. When sharing a library across multiple persons, each user might have a different directory. Either, each user can set his directory in the "Main file directory". In case the group also shares papers and thus there are two directories (the private one and a group-shared one), one can set a directory within the library (the "General file directory"). In case a user has a different location of the shared folder (e.g., different paths on Linux and Windows), he can use the "User-specific file directory". This setting is persisted in the bib file in a way that it does not overwrite the setting of another user. For this, JabRef uses the username of the currently logged-in user (-<loginname> is used as a suffix in the jabref-meta field). So, both mary and aileen can set a different user-specific file directory.
If JabRef saves an attached file and my login name matches the name stored in the bib file, it chooses that directory. If no match is found, it uses the "General file directory" of the bib file. If that is not found, it uses the one configured at File → Preferences → Linked files.
In some settings, the bib file is stored in the same directory as the PDF files. Then, one ignores all the above directories and enable "Search and store files relative to library file location". In this case, JabRef starts searching for PDF files in the directory of the bib file. It is also possible to achieve this result by setting . as "General file directory" in the library properties.
Relative file directories obviously only work in the library properties for a bib file, e.g. a.bib Library → Library properties → General file directory → papers. Assume to have two bib files: a.bib and b.bib located in different directories: a.bib located at C:\a.bib and b.bib located at X:\b.bib. When I click on the + icon in the general Tab of file a.bib, the popup is opened in the directory C:\papers (assuming C:\papers exists).
If you have a file within or below one of your file directories with an extension matching one of the defined external file types, and a name starting with (or matching) an entry's citation key, the file can be auto-linked. JabRef will detect the file and display a "link-add" icon in the entry editor, at the left of the filename. Click on the "link-add" icon to link this file to the entry.
The rules for which file names can be auto-linked to a citation key can be set up in File → Preferences → Linked files, section Autolink files.
Files can be automatically renamed and organized in folders according to custom patterns. The pattern syntax follows the same as for the Customize the citation key generator. JabRef can rename files according to this pattern, either automatically or as part of a cleanup operation.
With file directory pattern, JabRef can automatically create subfolders and move the files into the directory based on the defined pattern. As an example, you have a single folder, e.g. papers for all your PDFs linked to their corresponding entry in JabRef. Now you want to arrange them according to defined groups. Let's say you have two groups, Automation and Biology, with a couple of entries.
Now set the file directory pattern to: [groups:(unknown)]
If you now execute the cleanup action "Move files", JabRef will automatically move the files of the corresponding in the file directory to the subfolders papers/Automation and papers/Biology respectively.
Explanation: The expression in the brackets says: Create a subdirectory based on the field “groups” of the entry. If the field groups is not set or empty, use “unknown” as a fallback name for the directory. If you have one entry assigned to multiple groups, the directory will have the name “groupA, groupB”.
For an entry, if you want to download a file and link it to the entry, you can do this by clicking the Download button in the entry editor.
A dialog box will appear, prompting you to enter the URL. The file will be downloaded to your main file directory, named based on the entry's citation key, and finally linked from the entry.
It is possible to have greater flexibility in the naming scheme by using regular expressions for the search. In most cases, it should not be necessary though to adapt the given default.
If you open the preferences (File → Preferences → Linked Files), you will find in the section Autolink files an option called "Use regular expression search". Checking this option will allow you to enter your own regular expression for search in the PDF directories.
The following syntax is understood:
* - Search in all immediate subdirectories, excluding the current and any deeper subdirectories.
** - Search in all subdirectories recursively AND the current directory.
. and .. - The current directory and the parent directory.
[title] - All expressions in square brackets are replaced by their corresponding citation key pattern.
[extension] - Is replaced by the file-extension of the field you are using.
All other text is interpreted as a regular expression. But caution: You need to escape backslashes by putting two backslashes after each other to not confuse them with the path-separator.
The default for searches is **/.*[citationkey].*\\.[extension]. As you can see, this will search in all subdirectories of the extension-based directory (for instance in the PDF directory) for any file that has the correct extension and contains the citation key somewhere.
There are several ways to open an external file or web page. In the entry table, you can click on the PDF icon to open the PDF. In case there are multiple PDFs linked, always the first one is opened. You can also right-click on the line of the entry in the entry table and select "Open file". There is also a keyboard shortcut for this: In the default setting, this is F4, but it can also be customized.
To access any of an entry's links, click on the icon with the right mouse button (or Ctrl + Click on Mac OS X) to bring up a menu showing all links.
In general, there is no need to change the settings of external file types. So, this setting is for advanced users. See Manage external file types.
Modify easily the field names and the field contents
After selecting a set of entries, go to Edit → Manage field names and content, to set, append, rename and clear a field.
To select all the entries of the current library, pressCTRL + A.
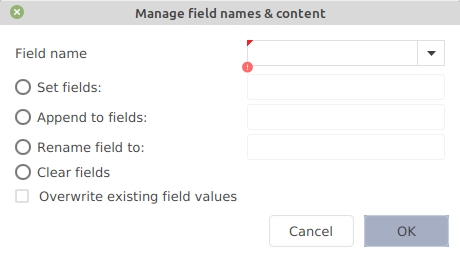
This dialog window is displayed:
Set the field name (by typing it in or using the drop-down menu), and select the action to be carried out. Additionally, a checkbox allows overwriting the existing field values.
The actions are:
Set fields. Enter the field content to be used. For example, "Field name = owner" and "Set fields = Smith" adds the line "owner = {Smith}," to the entries. If the field "owner" is already present in an entry, it is not modified, except if "Overwrite existing field values" is checked.
Append to fields. Enter the string to be appended at the end of the field content (if the field does not exist, it will be created). For example, "Field name = keywords" and "Add to fields = , programming" adds the keyword "programming" to the list of keywords.
Rename field to. Enter the new name for this field. For example, "Field name = institution" and "Rename fields = school" renames the field "institution" into "school". The field content is not altered.
Clear fields. This removes the field from the entries. For example, set the "Field name" to "comments". If "Overwrite existing field values" is checked, all the fields "comments" (and their content) are removed. If it is not checked, only the empty fields "comments" are removed.
External resource: A concrete example of using this feature to prune a library.
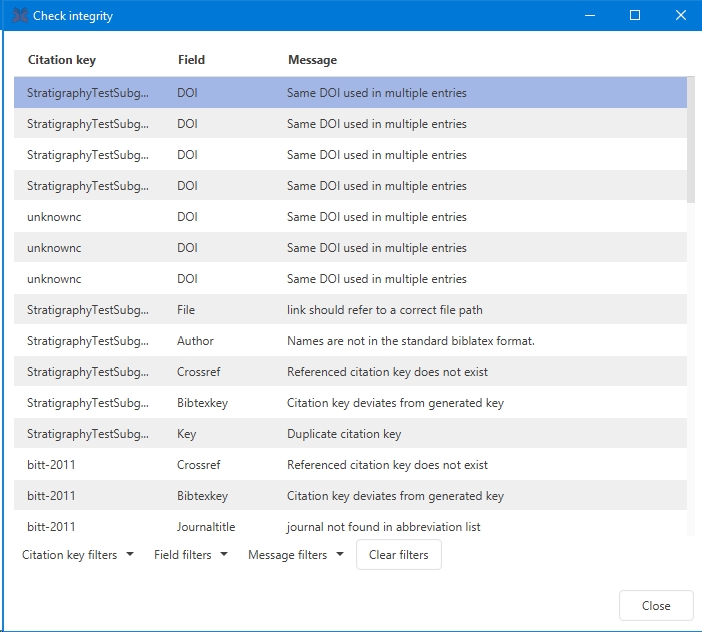
JabRef can check the integrity of a library.
This feature is available through Quality → Check integrity.
JabRef can help you to merge entries of your library.
First, select the two entries to be merged. Then select the menu Quality → Merge entries. Alternatively, select the right-click menu Merge entries.
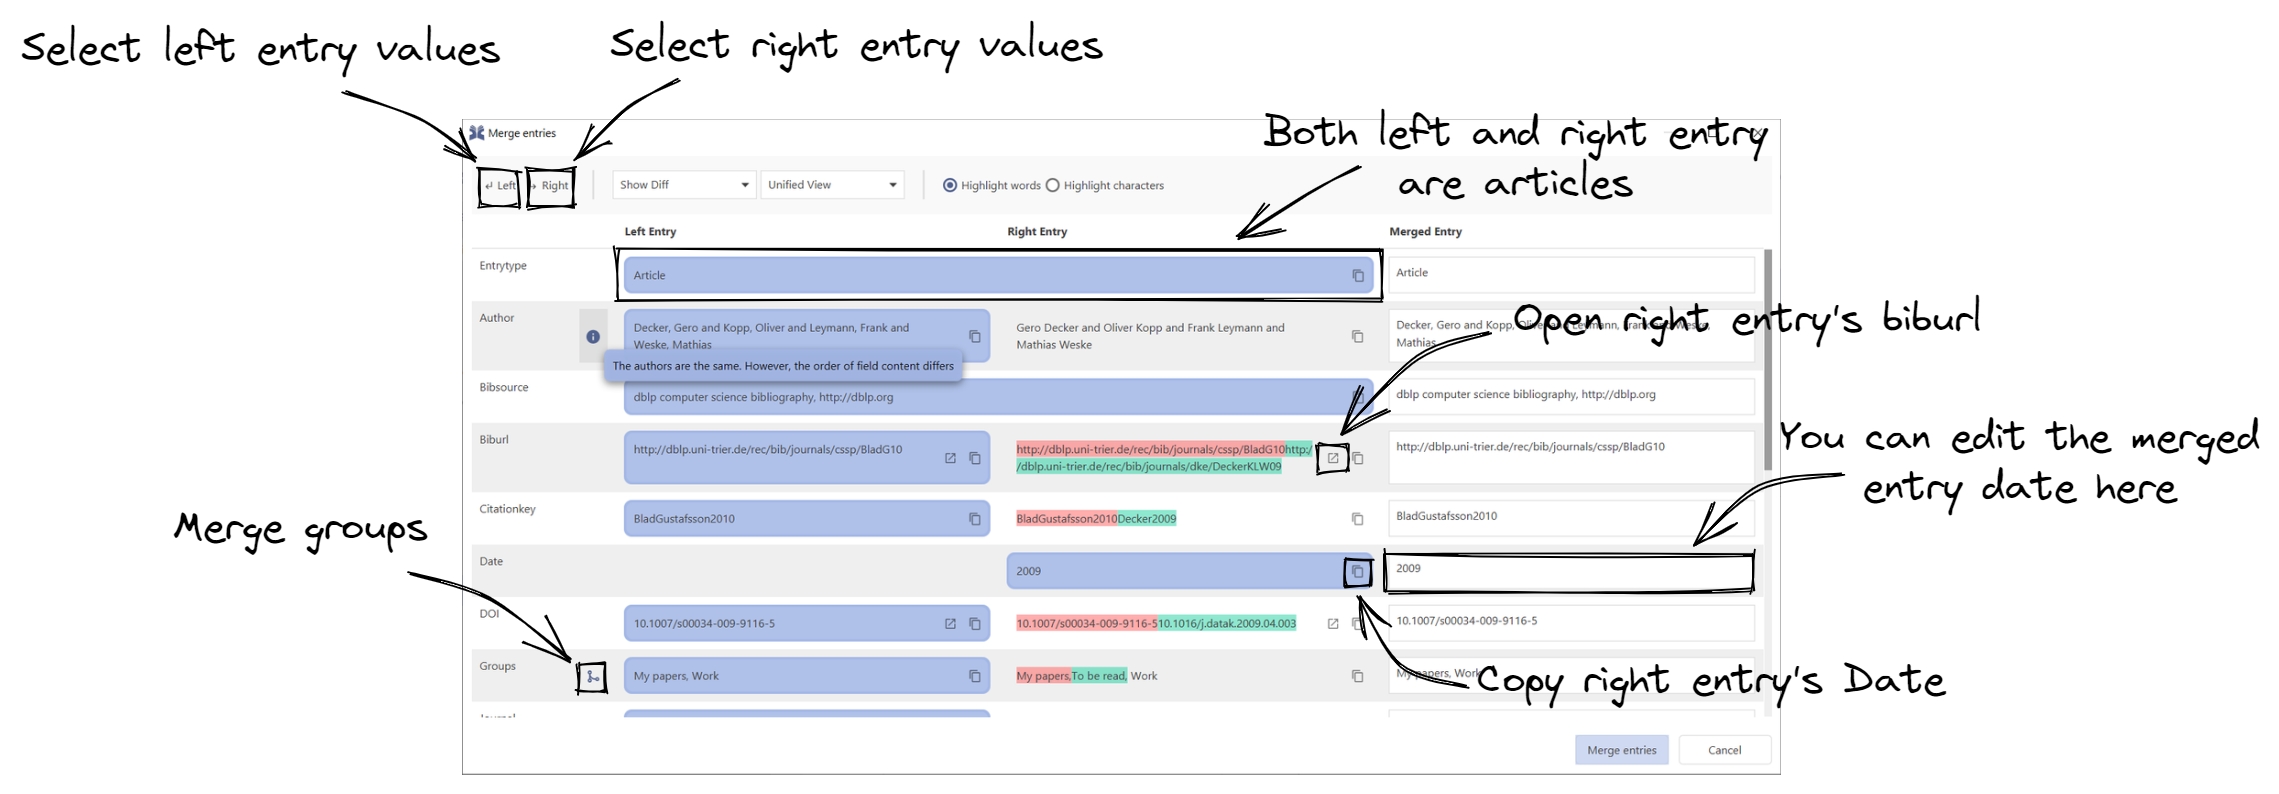
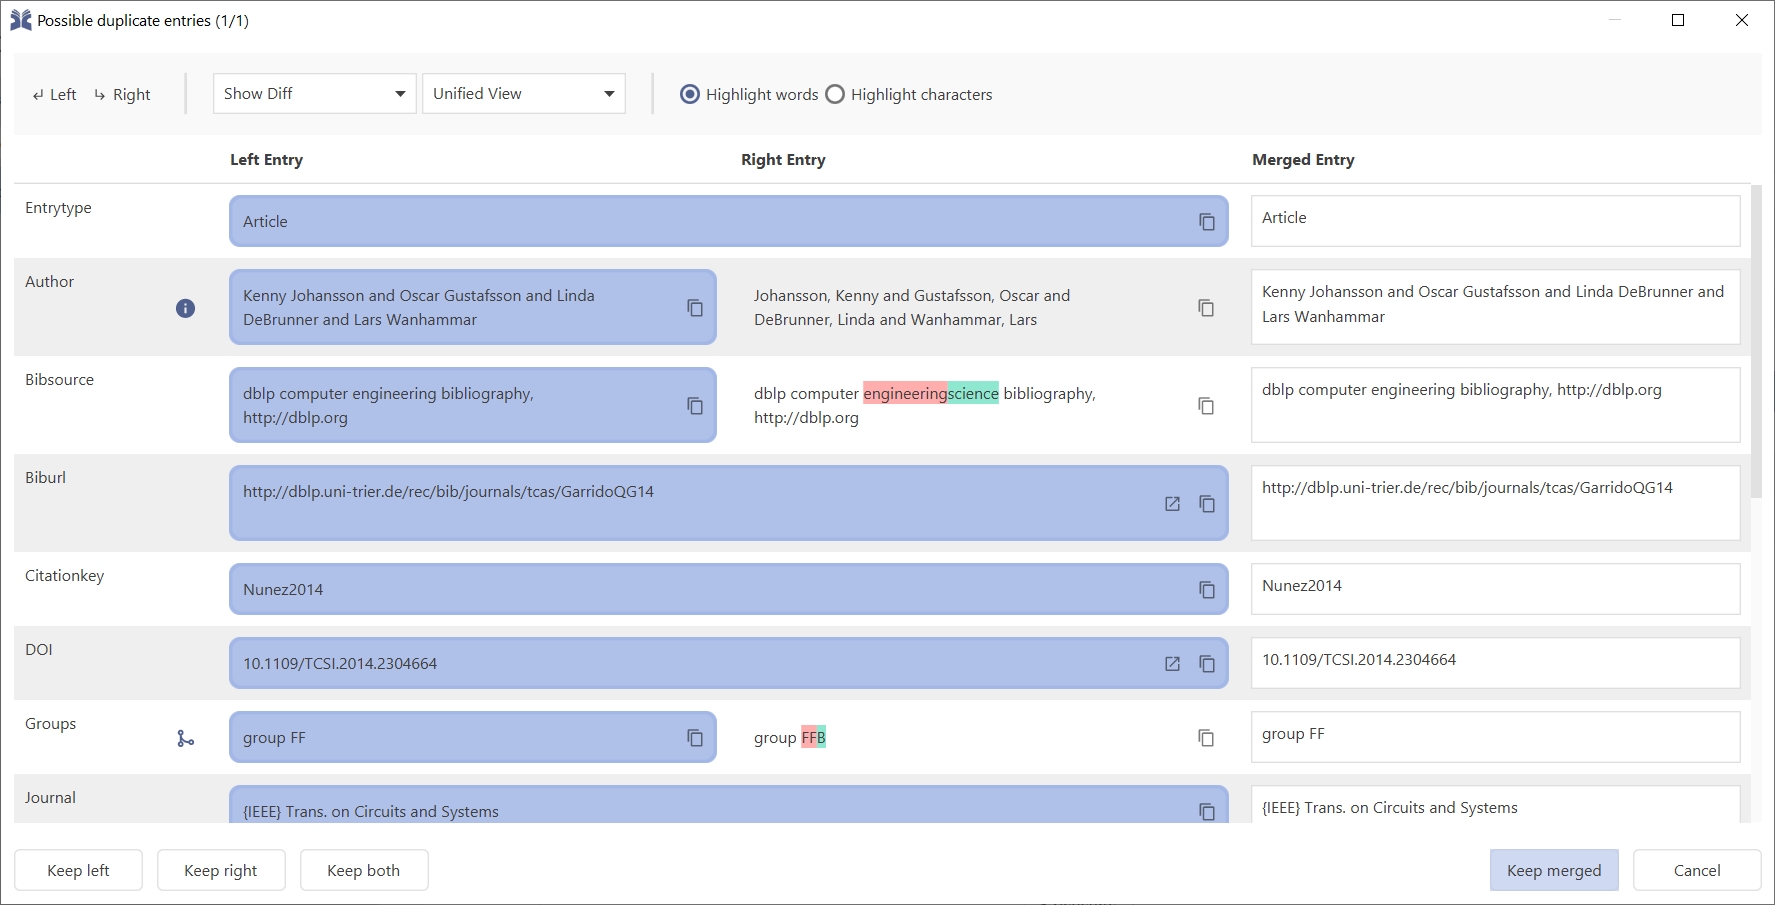
The Merge entries window will pop up:
The differences between the two entries can be configured through the toolbox located at the top of the window. From the toolbox, you can choose to show or hide differences, choose how to display differences (Unified or Split) and you can also choose how to compare entries (by words or characters).
Plain Text — This option hides the differences.
Show Differences — This option shows the differences.
Unified View — In this mode, differences are shown on the right side.
Split View — In this mode, differences are shown on both sides, with deletions on the left side and additions and updates on the right side.
Highlight words — This option compares entries values in terms of words.
Highlight characters — This option compares entries values in terms of characters. It divides both entry values into characters before comparing each character individually. This is perfect for comparing values with small differences (1 or 2 different characters).
From the toolbox's top-left corner, you also can choose to select all the left entry values by clicking Left or selecting all the right entry values by clicking Right. Be aware that selecting all entry values will select a value even when it is empty.
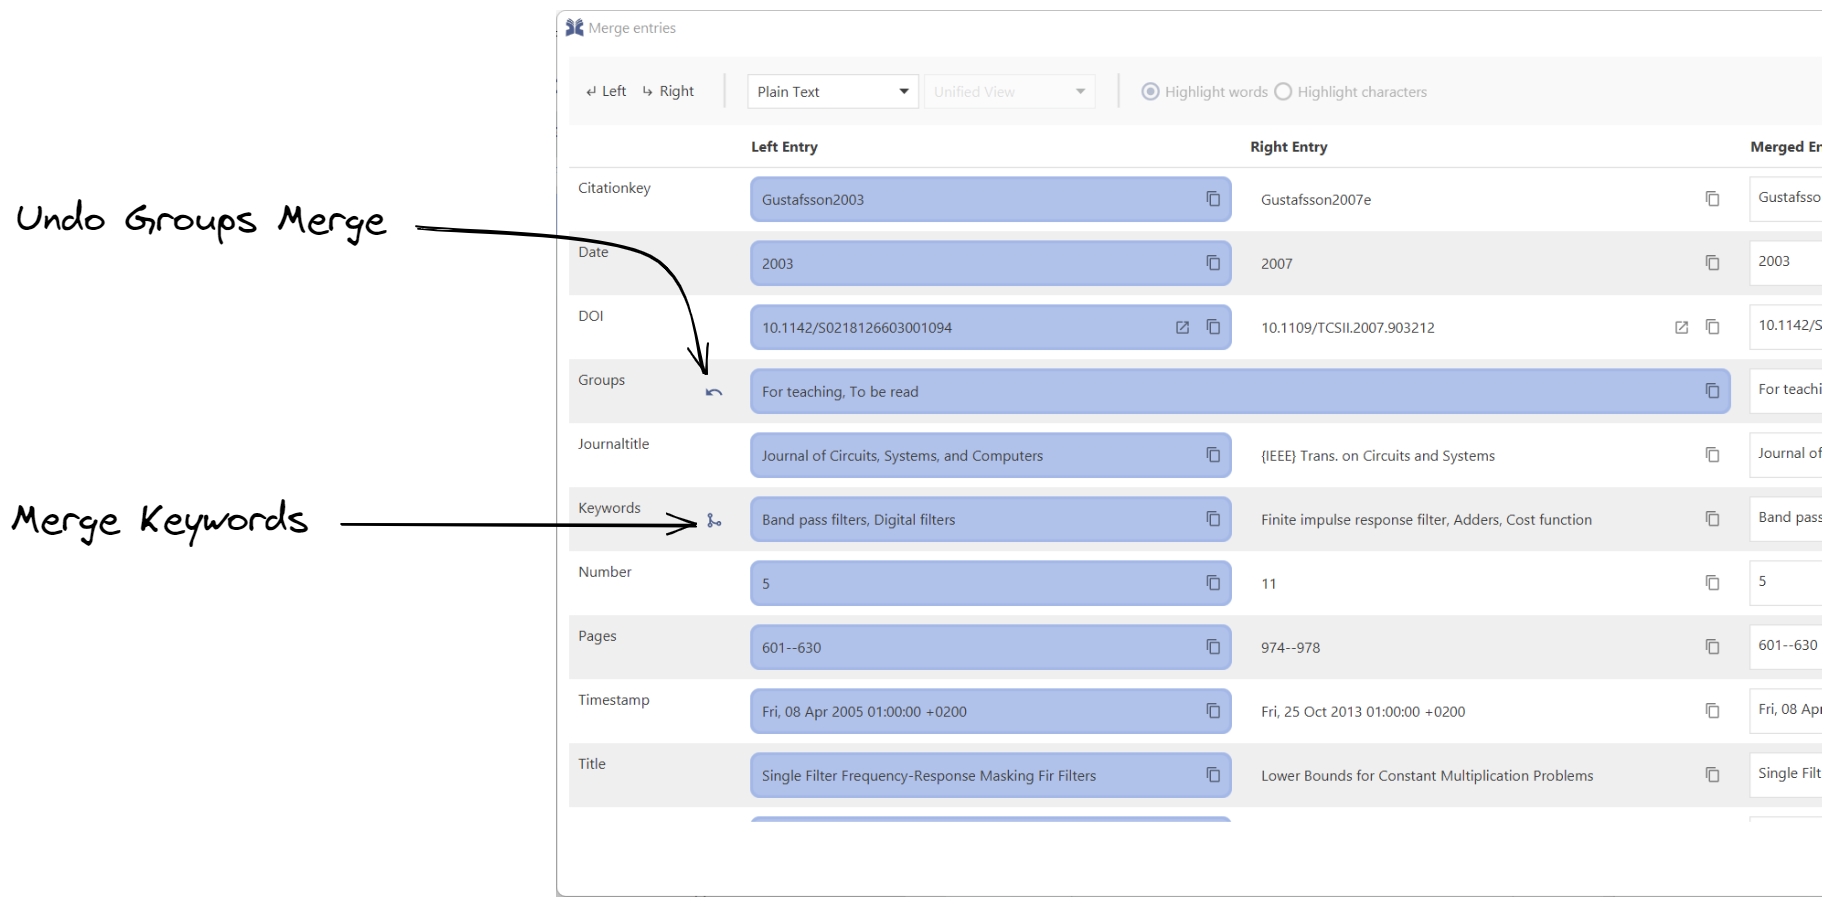
When merging entries, sometimes you want to select both values for a certain field. A common use case for this would be wanting the merged entry to have both the left and right entry groups. Now, you can simply click the merge button next to the groups label and we’ll take care of the rest. We’ll merge the left and right entry groups, keeping only one copy of any common group. And this works for more than just groups - you can also merge keywords, comments and files. So go ahead and give it a try - it’ll make your life a lot easier.
There are two buttons at the end of each field cell: one for copying the content of the field cell, and the other for opening links; at the moment, only URLs and DOIs can be opened.
For each field, you can select whether to choose the left entry value or the right one. You can do that by clicking on the given field cell. Once you did that, the merged entry will update its content to reflect the new change.
You can also edit the merged entry values manually. Doing so, will update the selected field cell if the left or right cell equals that value you typed.
Finally, after selecting which fields to keep, you can decide to Merge entries. Alternatively, you can press Cancel.
See also: Find duplicates
How JabRef can make your life easier
Group for your own papers: author=YOURSELF
Group for the papers of your team: author=YOURSELF and author=COLLEAGUE1 and author=COLLEAGUE2
Library → Library properties.
Use Quality → Check integrity often to ensure that the quality of your library does not degrade.
To ensure that your library stays consistent, specify your save actions in Library → Library properties.
JabRef can look for duplicated entries inside a library.
This feature is accessible directly through Quality → Find duplicates. It is also used when from a supported reference format or directly from the Internet.
Detection of potential duplicates is done by an edit distance algorithm. Extra weighting is put on the fields author, editor, title. and journal.
The differences between the two entries can be configured through the toolbox located at the top of the window. From the toolbox, you can choose to show or hide differences, choose how to display differences (Unified or Split) and you can also choose how to compare entries (by words or characters).
Plain Text — This option hides the differences.
Show Differences — This option shows the differences.
Unified View — In this mode, differences are shown on the right side.
Split View — In this mode, differences are shown on both sides, with deletions on the left side and additions and updates on the right side.
Highlight words — This option compares entries values in terms of words.
Highlight characters — This option compares entries values in terms of characters. It divides both entry values into characters before comparing each character individually. This is perfect for comparing values with small differences (1 or 2 different characters).
From the toolbox's top-left corner, you also can choose to select all the left entry values by clicking Left or selecting all the right entry values by clicking Right. Be aware that selecting all entry values will select a value even when it is empty.
You are offered to:
Automatically remove exact duplicates. This button shows up if there are exact duplicates. Click it to stop showing other exact duplicates and have them removed automatically.
Keep left — Keeps the left entry and removes the right entry.
Keep right — Keeps the right entry and removes the left entry.
Keep both — Keeps both entries. This usually means that you don't consider the entries to be duplicates.
Keep merged — Keeps the merged entry only and removes the previous entries.
Cancel — Closes the dialog and stops showing other duplicates.
Shortens DOI to more human-readable form using .
The can also be used as modifiers in using their keys listed below.
Library → Library properties, items General file directory, and User-specific file directory.
.
clear
escapeUnderscores
escapeAmpersands
html_to_latex
cleanup_url
html_to_unicode
latex_cleanup
normalize_date
normalize_month
normalize_names
normalize_page_numbers
ordinals_to_superscript
remove_braces
short_doi
unicode_to_latex
latex_to_unicode
units_to_latex
unprotect_terms
capitalize
lower_case
sentence_case
title_case
upper_case
minify_name_list
